
Starting a blog might seem difficult, but you don’t have to do it alone, In this guide, I will walk you through everything step-by-step How to Make a WordPress Website so you can easily create your own.
I promise, when you follow these steps, it will seem much simpler than you think.
When I first started WPHolder on WordPress, I had to do a lot of research. Through this article, I am sharing my experience with you so that you can easily create a fantastic WordPress website without any hassle.
And the best part is that you don’t need any technical knowledge or professional writing skills to start a WordPress blog. All you need is a topic that interests you and the desire to get started.
So, are you ready to share your thoughts with the world? Let’s start your blog.
What is WordPress Actually ?
WordPress is the world’s most popular open-source content management system (CMS) that allows users to create dynamic websites and blogs. With WordPress, you can truly customize your blog to your liking and needs. It helps users easily update, customize, and manage their websites.
You might be surprised to know that 40% of all websites in the world use WordPress.
For More Information Read Full Guide : What is WordPress Name ?
Start Your WordPress Website
To get started with WordPress.org, you only need three things :
- A domain name – This is your blog’s url (like wpholder.com)
- Web hosting – This is where your blog files are stored
- WordPress – Software
You might be wondering why you need to buy a domain separately when the hosting company is already providing one.
Some people prefer to buy their domain name and web hosting from different companies because it gives them more control over their website and makes it easier to switch hosting providers anytime.
Here at wpholder.com, we also use hosting and domain services from different companies.
Register Your Domain Name
What is Domain Name ? You can register your domain name with a domain registrar. A domain registrar is a company that sells and manages domain names.
Read : How to Choose a Domain Name for Your Website – 10 Tips That Work
Here are some popular and reliable places where you can register your domain name:
- GoDaddy
- Namecheap
- Google Domains
- Name.com
Register Your Domain Name with GoDaddy
GoDaddy is a popular and excellent option for beginners. GoDaddy gives you complete control over your domain and makes it easy to connect to any hosting service later on.
Since GoDaddy is our top pick, we will register our domain through them. However, if you prefer not to use GoDaddy, you have the option to register with Namecheap, Google Domains, or any of the other alternatives above mentioned.
Let’s go step by step to register a domain with GoDaddy.
Complete Guide : How to Register a Domain Name on GoDaddy- Step by Step Guide
Straightaway, open GoDaddy in a new tab, this is where you can search for and buy your domain name.
Step 1 : Use the search bar on the homepage, type the name you want for your website. For example, dopnop.com. Click Search Domains button.
Note – Type your domain name instead of dopnop.com.
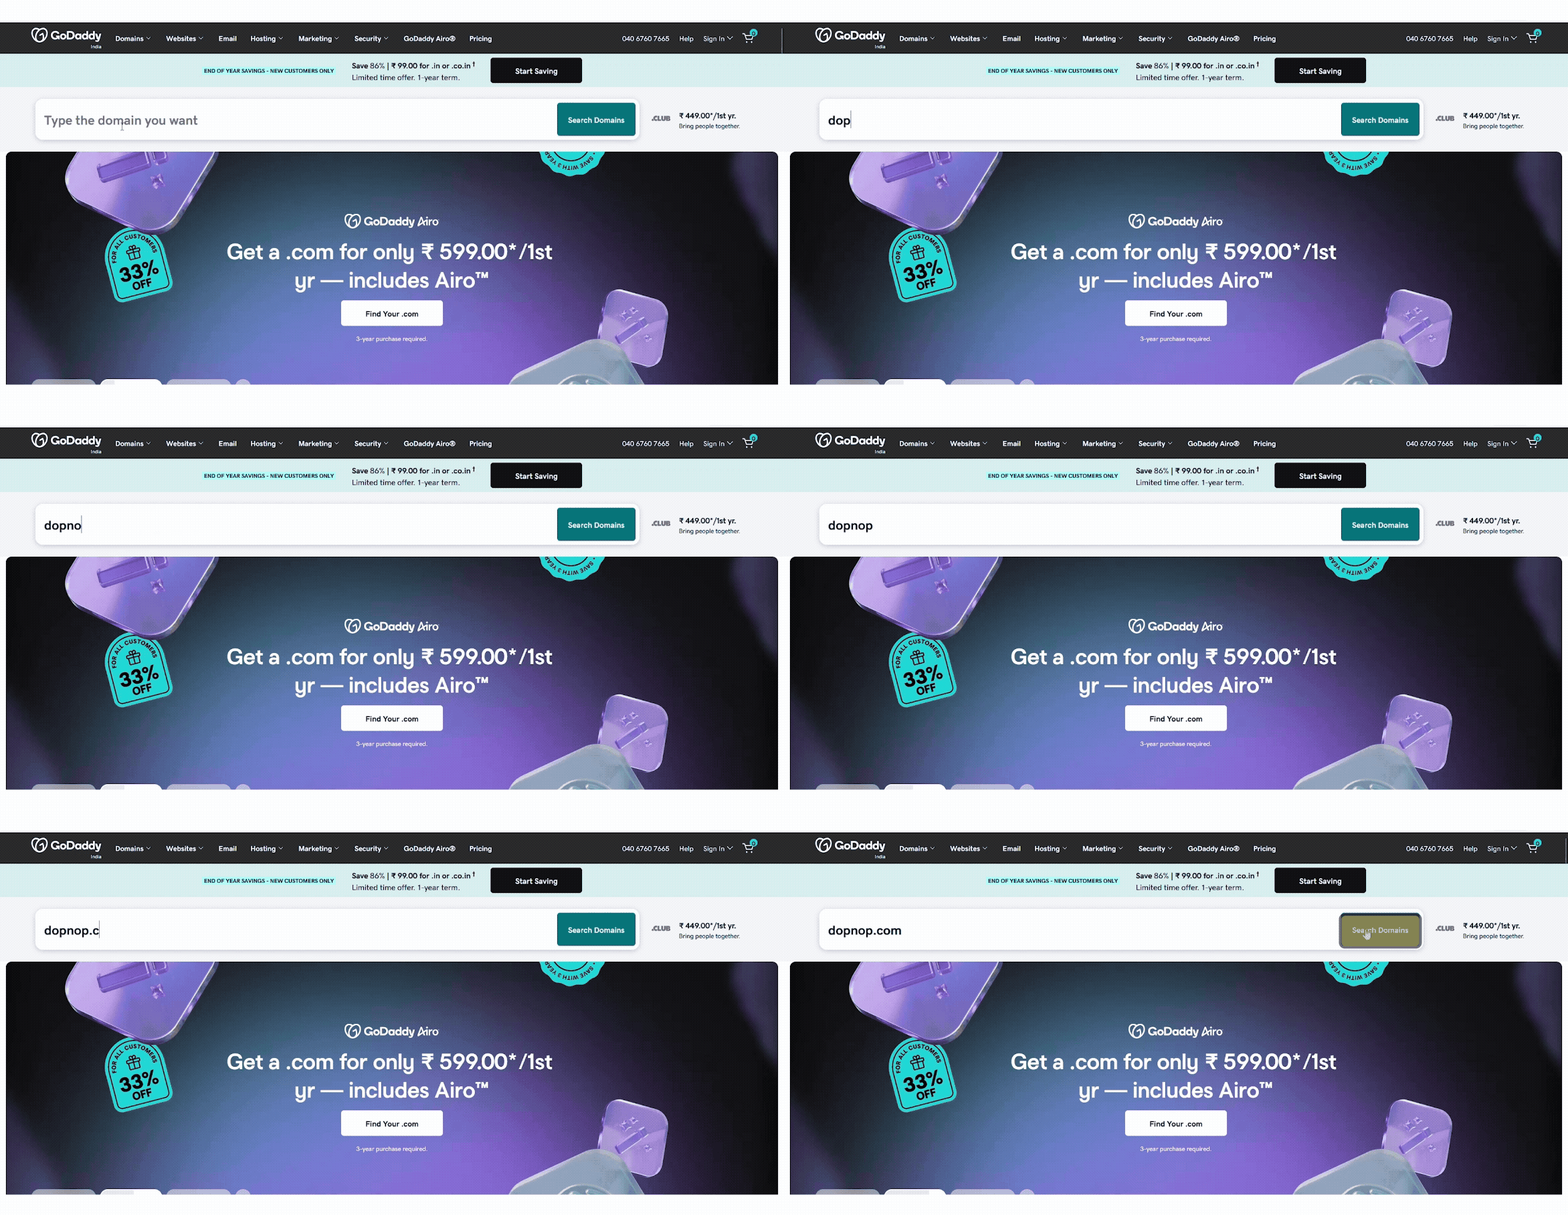
Step 2 : Add Your Domain to the Cart Once you find the perfect name, click Add to Cart. This means you are ready to buy it
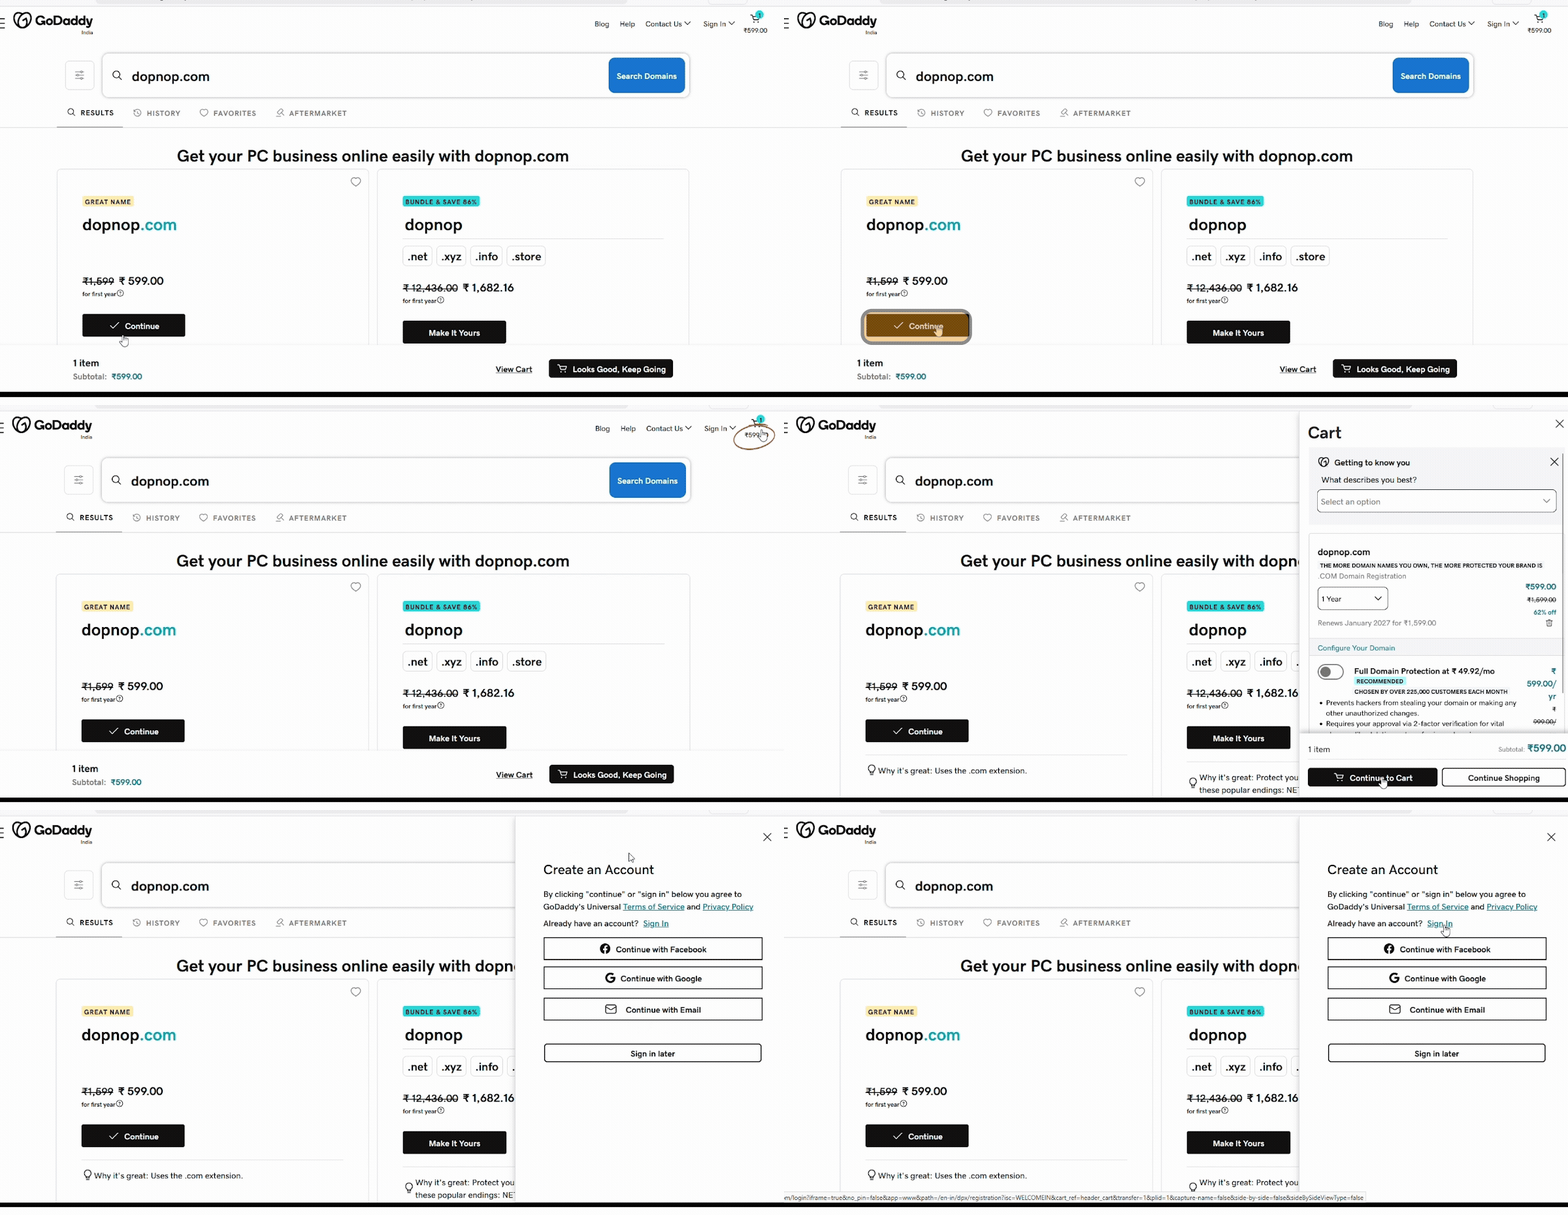
Step 3 : Sign in or create your Godaddy account
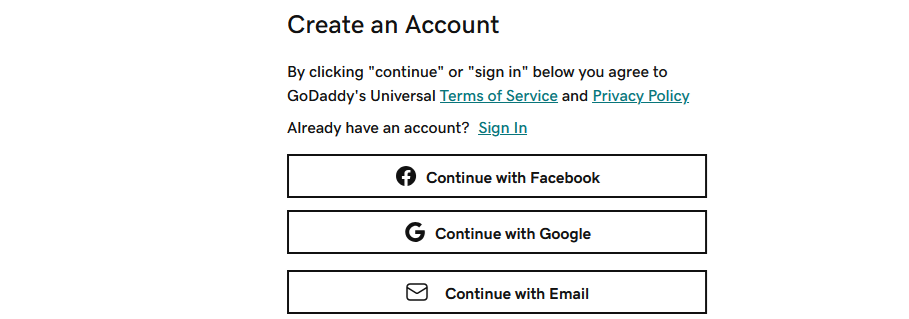
Step 4 : After, creating account simply login to Godaddy, you have to check out to payment, according to your choice make payment – like credit card or net banking.
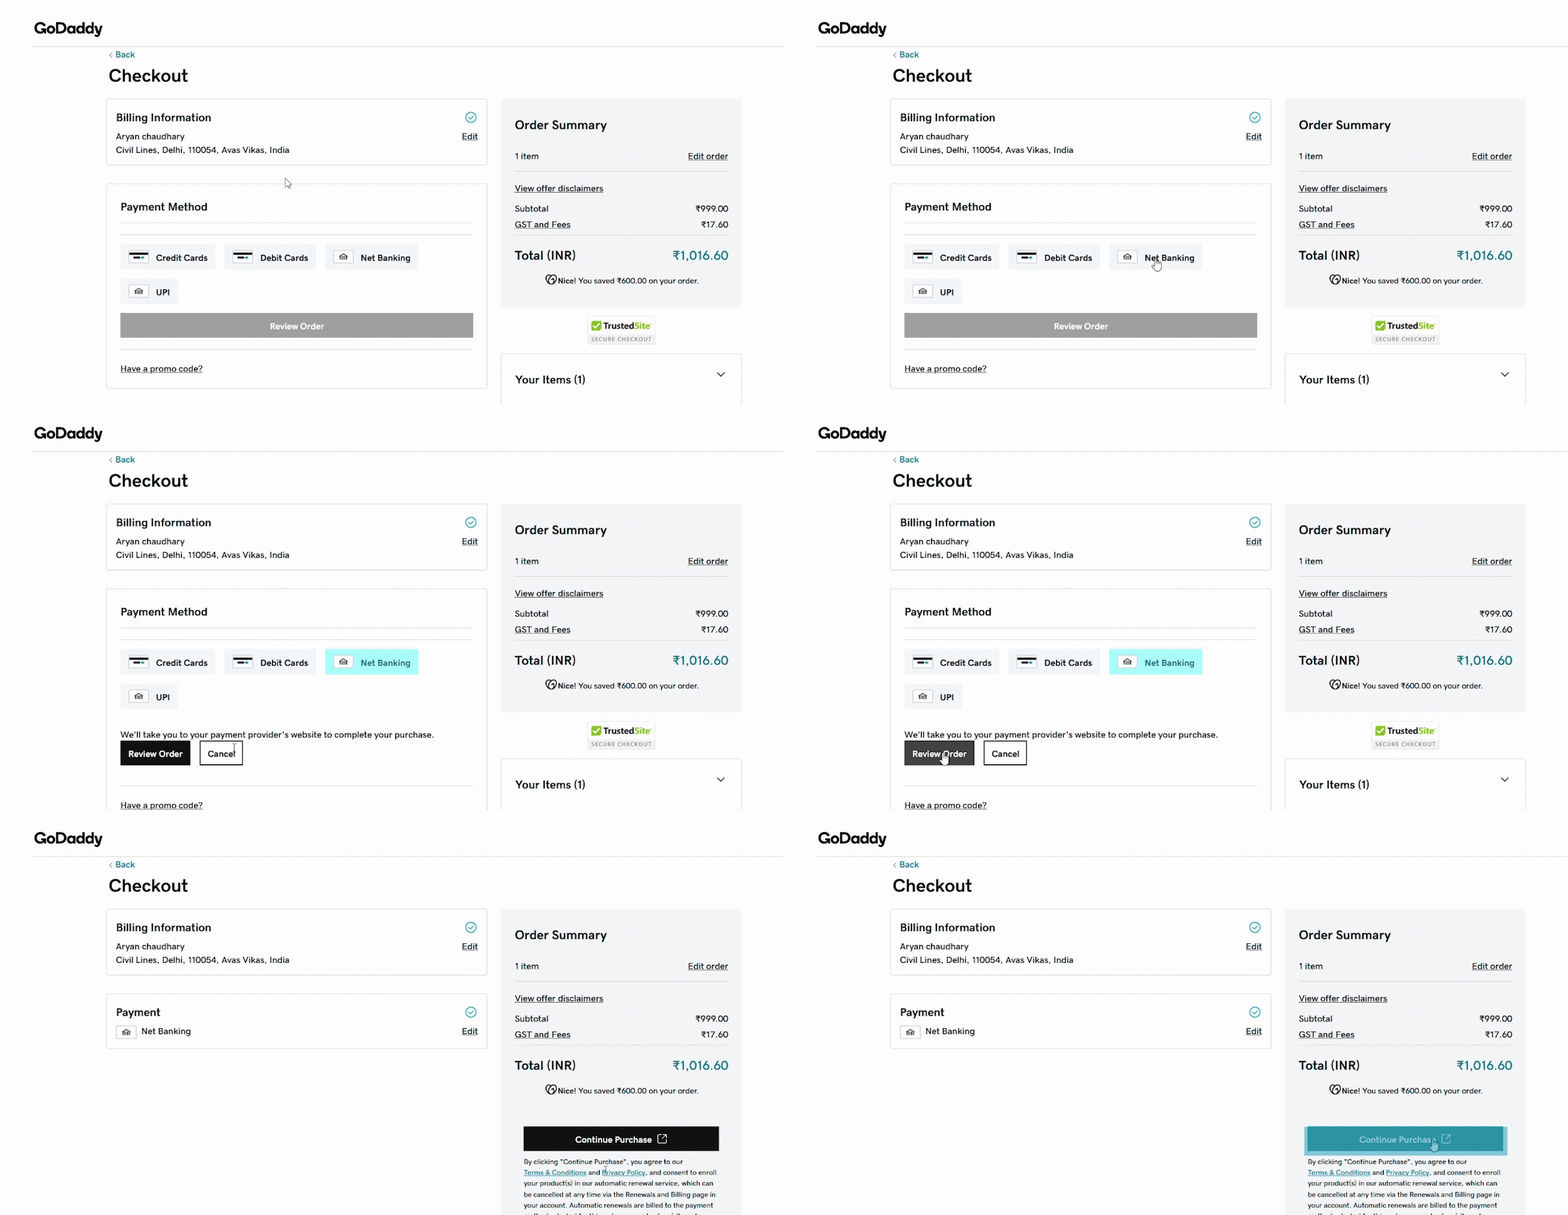
Once you successfully complete the payment, your domain will be registered and available in your GoDaddy account, which you can then manage.
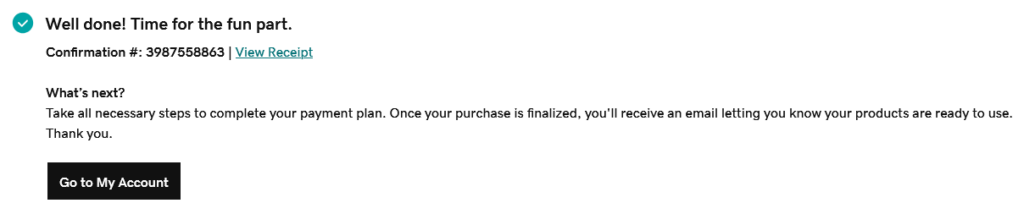
Our domain has been registered, and now we need good hosting. Therefore, the next step is to get a hosting account.
After setting up the hosting account, we will return here to link our newly registered domain to the hosting account.
Choose Hosting for WordPress
As a beginner, you might be wondering what web hosting is, let me explain it: a web host stores all the files of your website, just like your mobile phone stores your data.
There are many popular options available in the market that provide hosting services for WordPress, you can choose any of the options given below. Best Web Hosting for WordPress Beginners
- Bluehost
- Clouwdways
- SiteGround
- Hostinger
- DreamHost
First and foremost, we should choose a hosting provider that offers optimized WordPress hosting, which means that the servers and their settings are specifically designed for WordPress.
Nowadays, most hosting providers offer managed WordPress hosting services, but we need to find out who offers the best service. Our top choice is Bluehost, which is also recommended by WordPress.org.
Bluehost hosts over 5 millions of WordPress websites. And it’s one of the oldest hosting providers, having worked with WordPress since 2005.
So let’s get started with Bluehost.
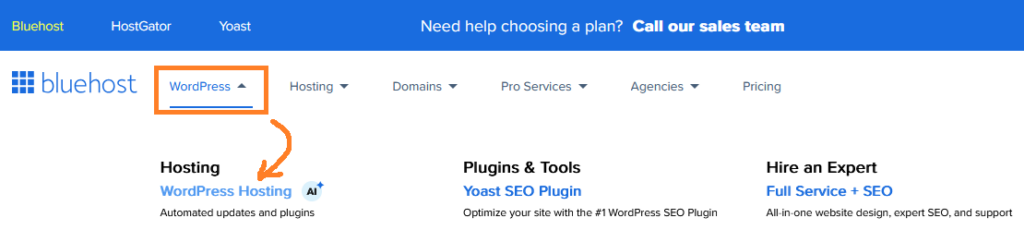
To begin, open Bluehost in a new tab and click on the ‘WordPress’ button in the menu to open the submenu, then navigate to ‘WordPress Hosting’.
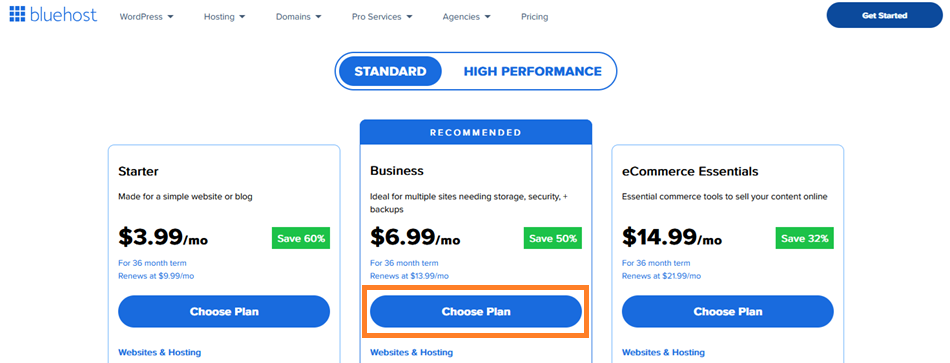
Scroll down to choose a hosting plan that suits your needs. The Starter and Business plans are the most popular options.
If you’re not sure which plan is right for you, we recommend starting with the Business plan, which Bluehost also recommends.
Next, click on Choose Plan.
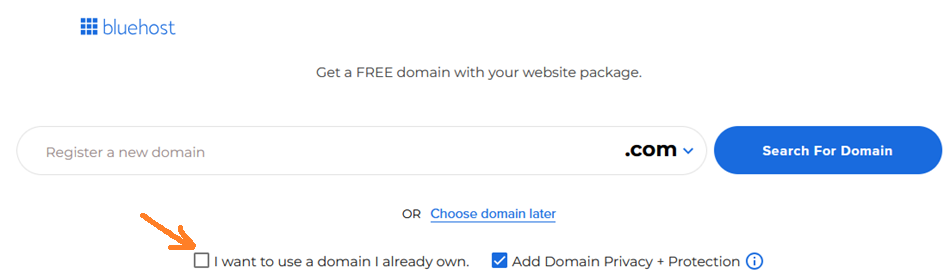
As can be seen, that the screen is asking for domain registration. Since we have already purchased a domain, we will skip this step.
Afterward, click on “I want to use a domain I already own.“
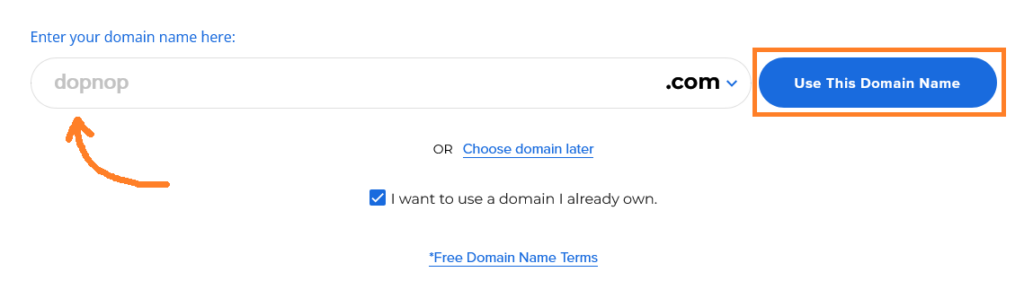
After clicking on “I want to use a domain I already own,” enter your domain name here. We are entering the domain we previously purchased from GoDaddy.
So, just enter your domain you already own.
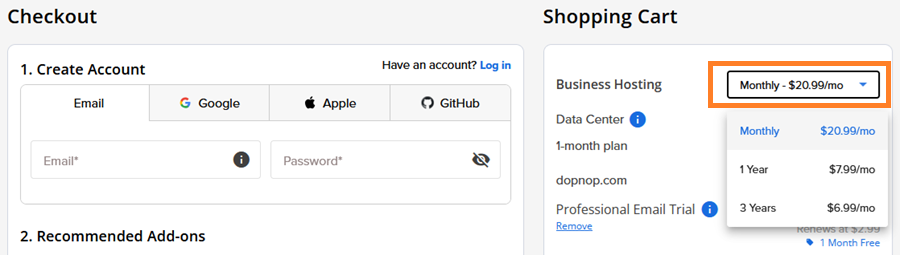
After choosing a domain name, you will be taken to the cart page. From here, you can view your order summary and finalize your package.
Under the account plan, specify how many years you want to sign up with Bluehost for. You can choose a Monthly, 1 Year, or 3 years plan.
The longer the plan, the greater the discount you’ll receive. Choose the plan that best suits your needs.
Simply create an account by entering your email address and password, or you can make the process easier by logging in using your Google account.
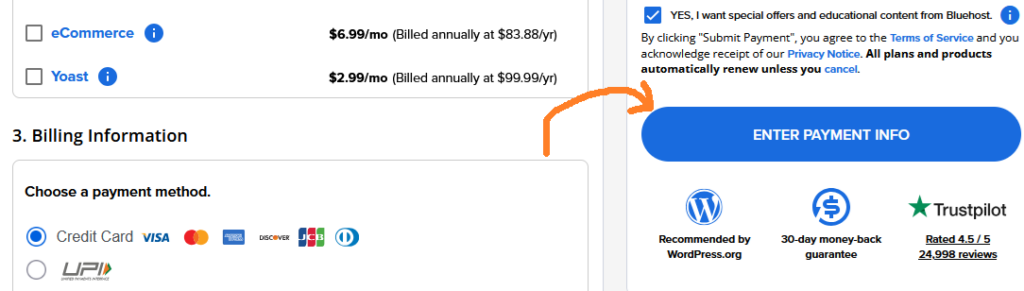
Now you can see the details of the Bluehost plan. Look carefully, because Bluehost automatically includes several expensive “extras,” such as domain privacy protection, SiteLock, CodeGuard, and SEO tools. Choose only what you need;
Remember, you can add these Add-ons later if necessary.
Enter your payment information and click the “Submit Payment” button to confirm your order. After payment, your new account details, including login and password information, will be emailed to you along with a payment confirmation.
After payment you will jump to your new bluehost account as your bluehost dashboard is being ready to use and ssl certificate is being created.
Now, Go to Websites » Manage.
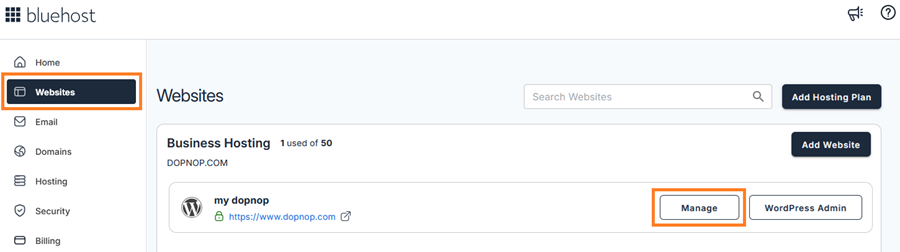
As soon as you click on Manage, you will see a screen similar to the one shown below. It has several menus. You need to click on Advanced. We will point the IP address here.
First, go to the Advanced tab » Name Servers and IP Addresses, then copy the IP address.
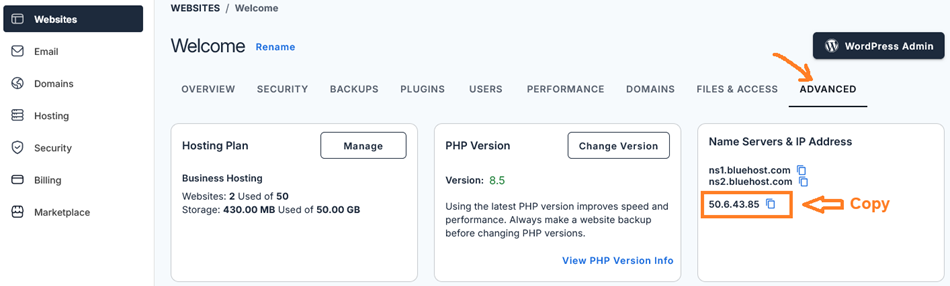
Now we need to connect our domain to Bluehost. You’ve already copied the IP address, so now we need to go back to where we purchased our domain. For example, if we bought our domain from godaddy.com, let’s go to godaddy.com and point the domain there.
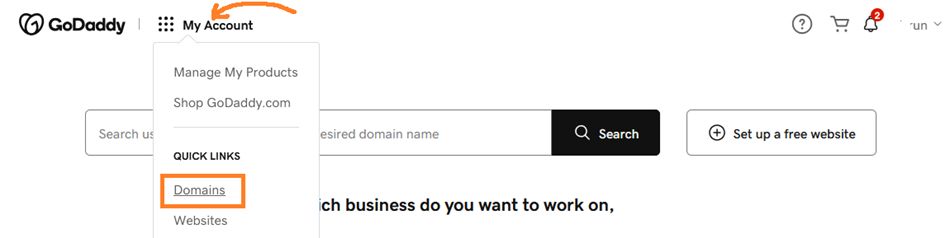
Next, login to your GoDaddy account and go to My Account » Domains.
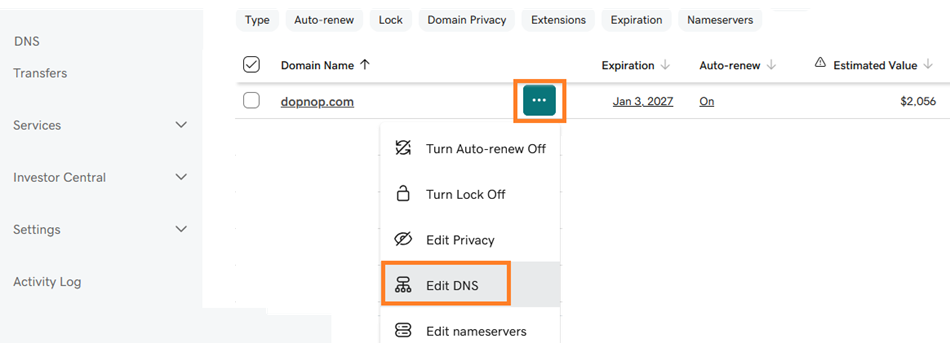
Now, within your domain portfolio, click on the three dots […] next to your domain name; then scroll down a little and click on Edit DNS.
click
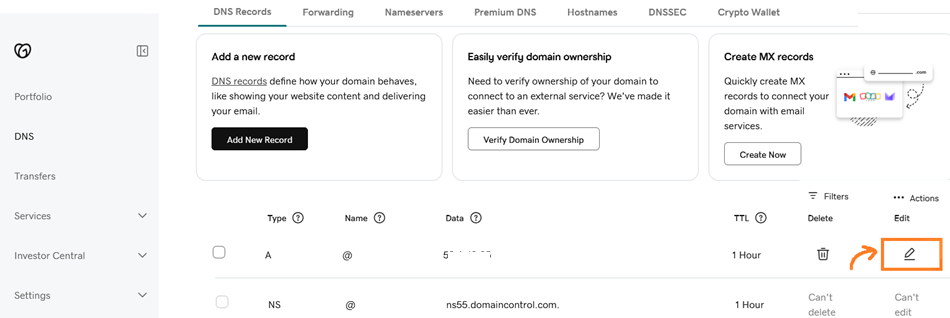
After clicking on the pencil icon ✎, Paste the IP address you copied earlier from Bluehost into the Value column.
then click the ‘Save’ button.
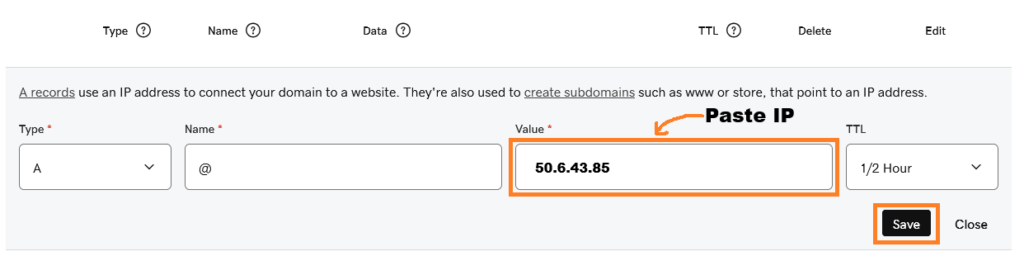
Wait at least 30 Minutes After Pointing IP address DNS changes can take up to 24-48 hours to fully propagate.
Go back, to bluehost Pannel
Now, go to Websites » Manage and then click on the ‘PHPMyAdmin‘ tab inside overview.
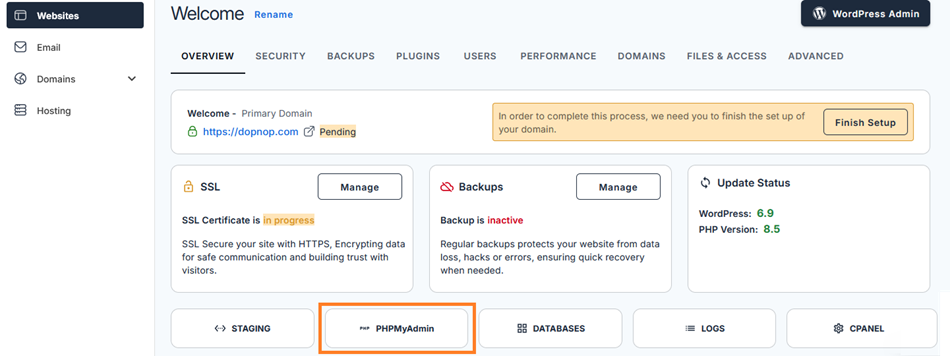
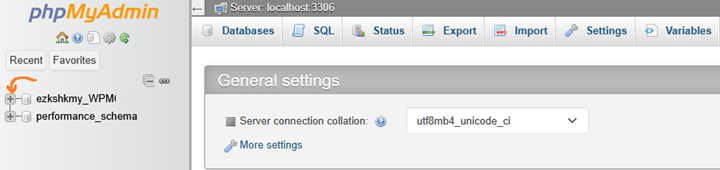
You will see your database at the top of the screen; simply click on the ‘+’ icon to expand the database row, as shown in the screenshot below.
Now, Change the temporary URL to your domain name.
Example: This is my temporary URL: https://ezk.shk.mybluehost.me. i will change it to https://www.dopnop.com.
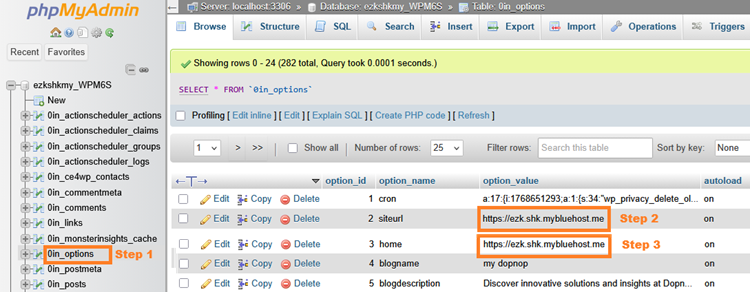
Let me show you how it is done.
To change the site URL, double-click on the URL next to “siteurl” and replace it with your domain (URL), then press the ‘Enter’ key.

To change the home URL, you will need to follow the same process again.
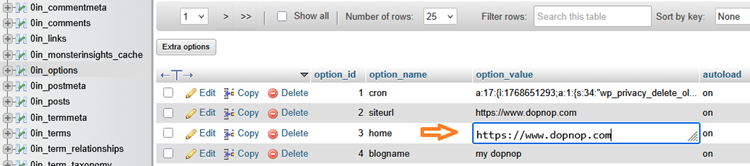
Note: Please remember that if you do not want to use “www” in your website URL, enter the URL without “www”.
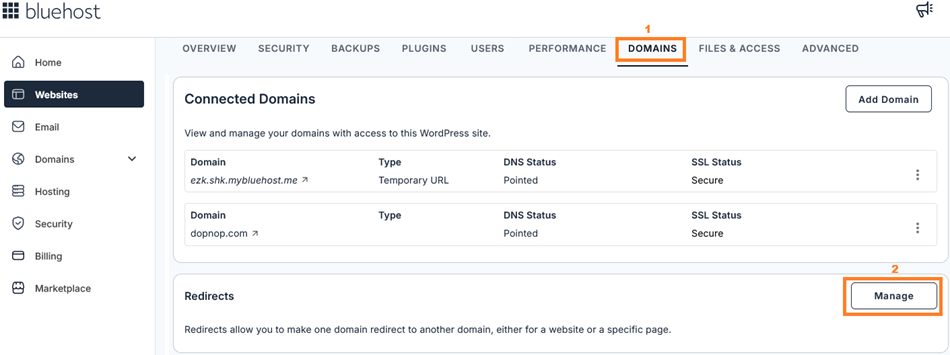
Now, you have to redirect the temporary url to permanent url to do so follow the steps.
Go to Websites » Manage » Domains and then click ‘Manage’ next to Redirects
To add a redirect, click the ‘Add Redirect’ button. A pop-up window will appear. Select the temporary URL in the ‘Domain’ field, and then enter your website’s full URL, including “https://”, in the ‘Redirect To’ field.
For example: https://www.dopnop.com
Also select redirect with or without www.
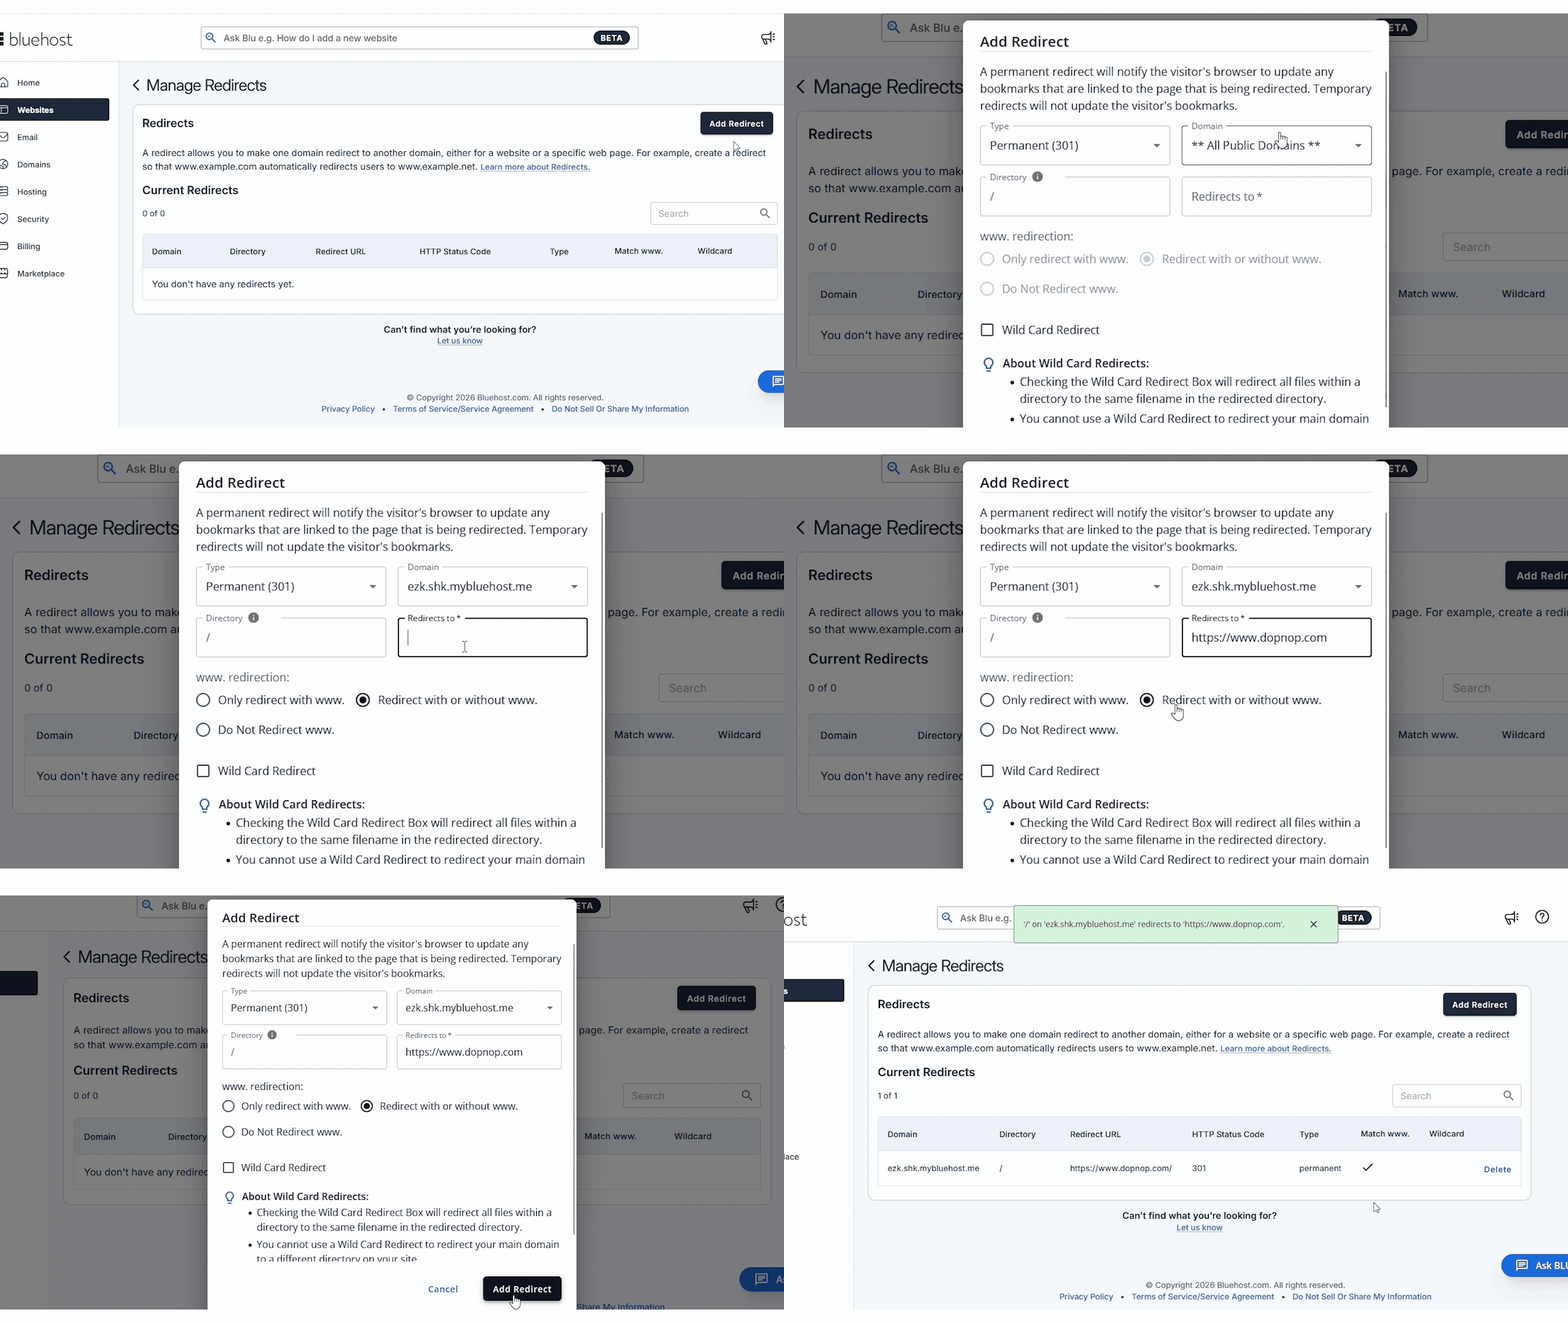
That’s it.
Now we will setup WordPress admin area.
Go to, Websites and then click on ‘WordPress Admin’ button.
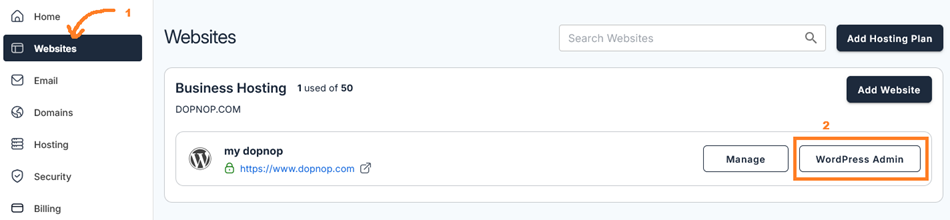
Clicking on WordPress Admin will launch the onboarding WordPress setup; you simply need to click on “fully customizable by you,” which will set up your website in just a few seconds.

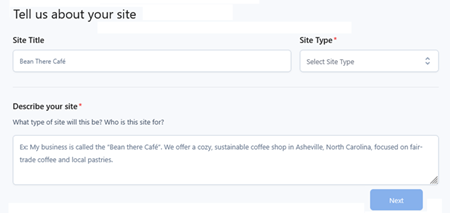
Next, it will ask you about your site.
- Add Site Title – this will be your site name
- Site Type – select Personal or Business from the dropdown menu
- Describe your website – write a few words about your website
This can be changed later at any time.
Finally, after filling in the details, click the ‘Next’ button.
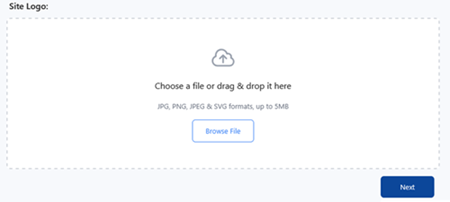
In the next step, it will ask you to choose a site logo. If you already have a site logo ready, select it; otherwise, click Next, and you can choose a logo later.
Now you will have to wait a little while; Bluehost is building your website. This may take approximately two minutes.

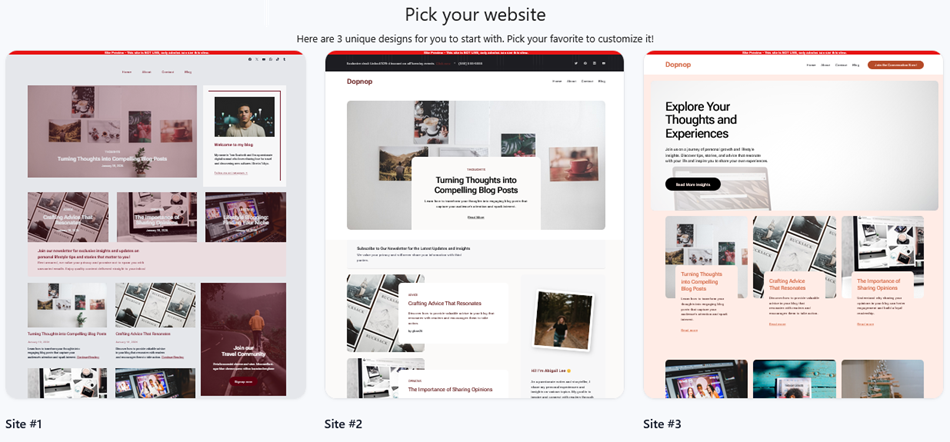
Bluehost has created three pre-built websites for you to choose from. For now, simply select the one you like best. Later, we’ll choose your preferred theme and customize it.
For now, We are choosing Site #1 here.
After selecting the site, you will see the next screen, where you need to publish the site to the live version. To do this,
Click on the ‘Save and Publish’ button.
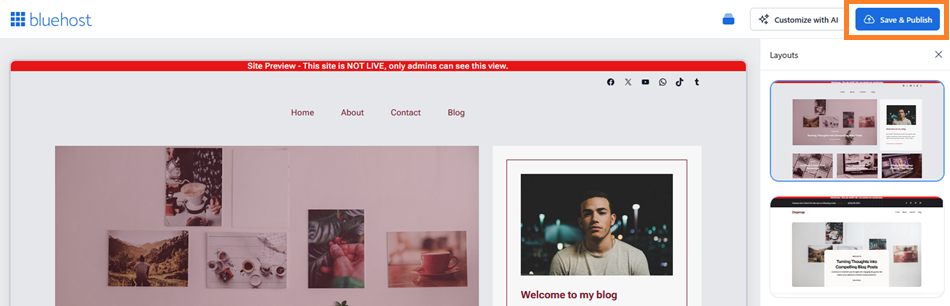
Now that the website is ready, you will see the WordPress dashboard for the first time; you’re new here, but you’ll become familiar with it very soon.
To visit your website’s home page for the first time, click on the home icon and then click on ‘Visit Site’ as shown in the screenshot below.
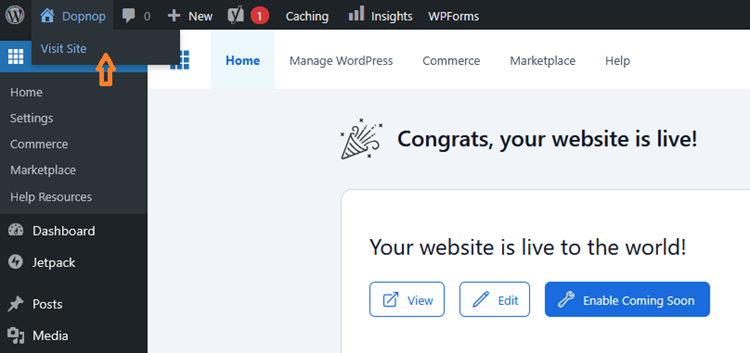
Congratulations! Your website is now live!
Alternatively, you can also access your WordPress dashboard by typing your website address in your browser followed by wp-admin, like this:
www.yourwebsitename.com/wp-admin
To get your username and password, click on Users from WordPress dashboard. You will find your WordPress username there.
For the password, click on the username and scroll down. You will see “Set New Password.” After generating a new password, click the ‘Update Profile’ button.
Write down these username and password details on a piece of paper or save them in a text file on your computer.
You might not like the look of your website, or it might not be exactly what you had in mind. Don’t worry, WordPress makes it easy; simply change the theme to give it a professional look.
Customizing Your Website Now
Whenever you create a new WordPress site, there are certain essential things you need to set up yourself. A list of these is provided below :
- Change WordPress Theme
- Adding your logo
- Creating a navigation menu
- Setting up the sidebar
- Installing essential plugins
- Setting up SEO-friendly permalinks
- Creating essential pages
- Writing the first post
To give your website a professional look, it is essential to set up all these elements; don’t worry, each of these tasks will take just a few minutes.
Simply follow the steps, we will guide you one by one.
Change WordPress Theme
The challenge for you is to choose the right theme for your website. My favorite free themes are ‘GeneratePress’ and ‘Astra’, which you can start with. The best part is that you can later switch to their paid versions to access premium features.
One of the best things about WordPress is that there are over 14,000 free themes available in the WordPress.org directory.
To begin, Go to your WordPress dashboard and click on Appearance » Themes. Then, click on the ‘Add Theme’ button.
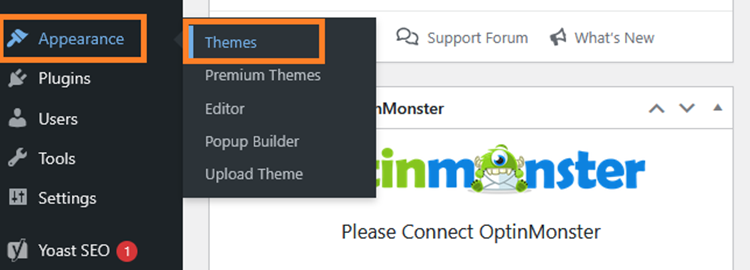
Here we are choosing the ‘Astra’ WordPress theme.
Generally, you will find ‘Astra’ among the most popular themes, and you can activate it by clicking on it. If you do not see it, you can search for “Astra” in the search box located next to the ‘Search themes’ option.
Read full guide on : How to Change WordPress theme
Once you find the Astra theme, you can install it on your WordPress site by hovering your mouse over the theme, clicking “Install,” and then ‘Activate’ it.
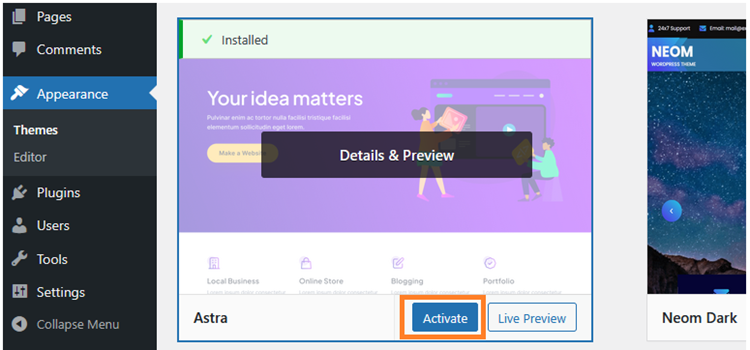
Your new theme is now active. After activation, please visit your website to make sure everything looks and works correctly.
I believe that a clean, simple, and straightforward blog or website is not only more appealing, but it also makes it easier for readers to find what they need and browse the site.
Now, When your theme is active, you can go to ‘Appearance » Customize’ to adjust the colors, fonts, and layout of your site to match your desired look.
Adding your logo
Your logo is the identity of your website. It appears at the top of every page so that visitors can easily remember your brand.

Add your own logo to make your blog unique. Read full guide on – Add Logo in WordPress Website
First, go to your WordPress dashboard and navigate to Appearance » Customize. This will open the WordPress Customizer along with a live preview of your site.
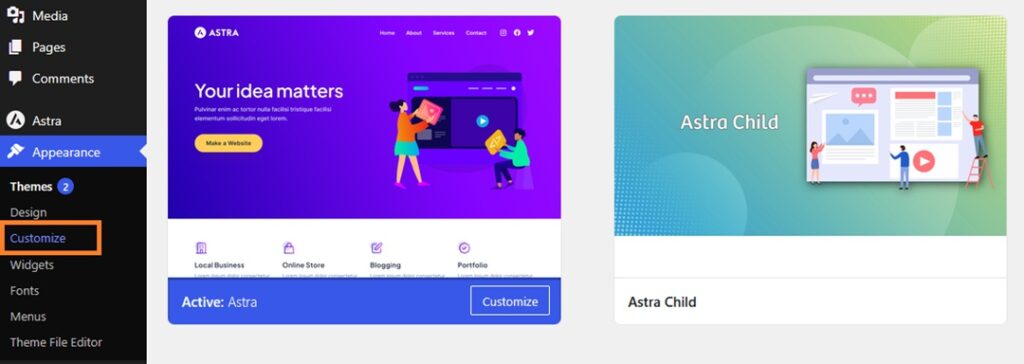
Next, click on the ‘Header’ section and then select ‘Site Title & Logo’.
Then, click the ‘Select Logo’ button and upload your logo image from your computer.
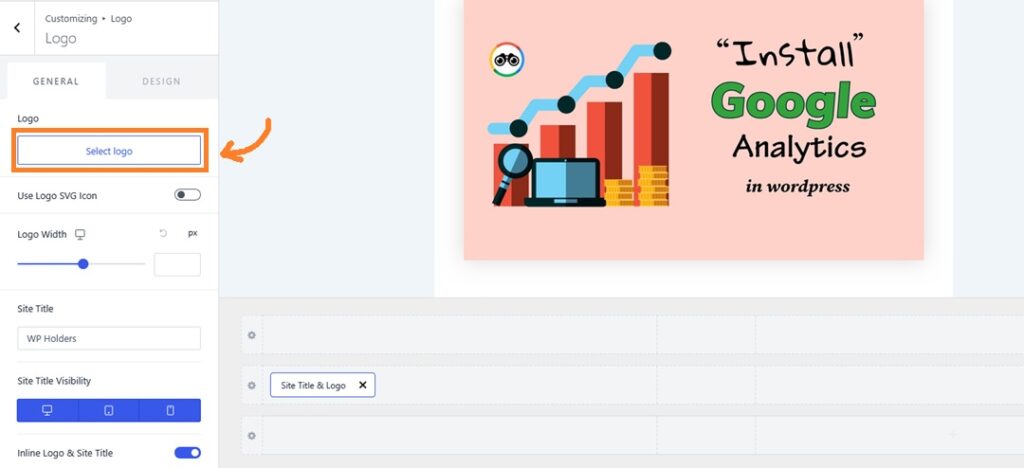
After uploading the logo, WordPress may ask you to crop it. If the size already looks right, you can either crop it or skip the cropping step.
Additionally, you can adjust the logo’s width using a simple slider; a width between 120 and 180 pixels works well for most websites.
Finally, click the ‘Publish’ button at the top to save your changes.
Creating Your Navigation Menu
A navigation menu helps visitors move around your website. It usually shows links like Home, About, Blog, and Contact at the top of every page.

So, let’s see how to create a navigation menu.
First, go to Appearance » Menus in your WordPress dashboard. Then, type a name for your menu, such as ‘Main Menu’.
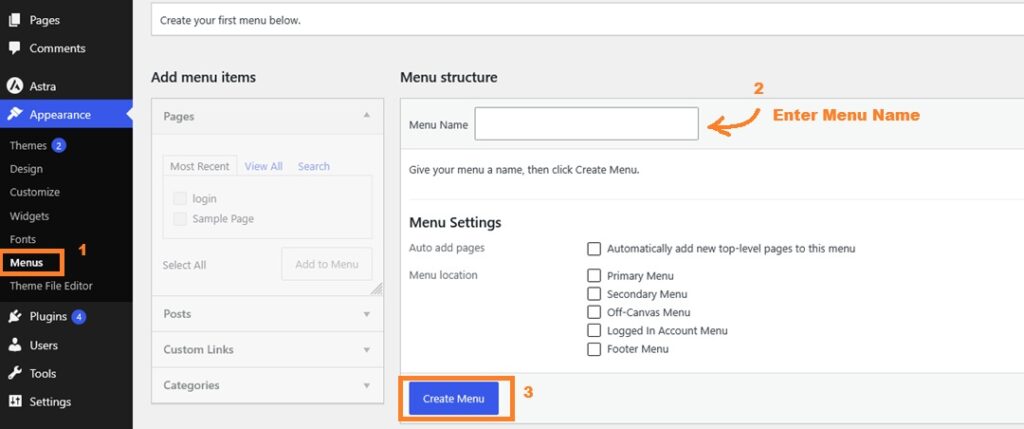
And click the ‘Create Menu’ button.
Next, look at the left-hand column. Here, you will see your pages, posts, and categories.
Simply check the pages, categories, custom links you want to include in your menu and click the ‘Add to Menu’ button.
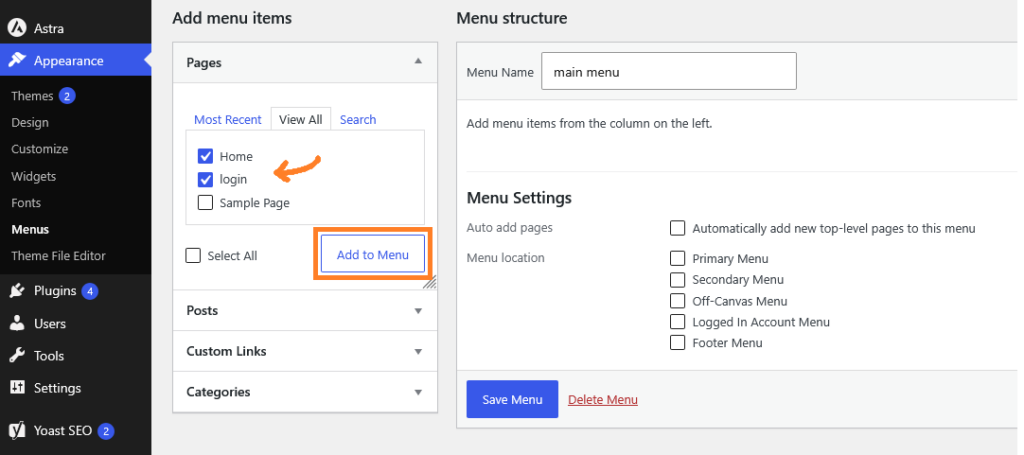
After that, you can drag and drop the menu items to change their order. You can also drag an item slightly to the right to make it a dropdown under another item.
Now comes the important part. Under “Menu Settings”, check the ‘Primary Menu’ box. This tells WordPress to display your menu in the header.
Just click the ‘Save Menu’ button.
Then, go to your website, and your new menu will be visible at the top.
Setting Up the Sidebar
The sidebar is the narrow column that appears next to your blog posts. It is a great place to show your recent posts, categories, a search box, or a short bio.
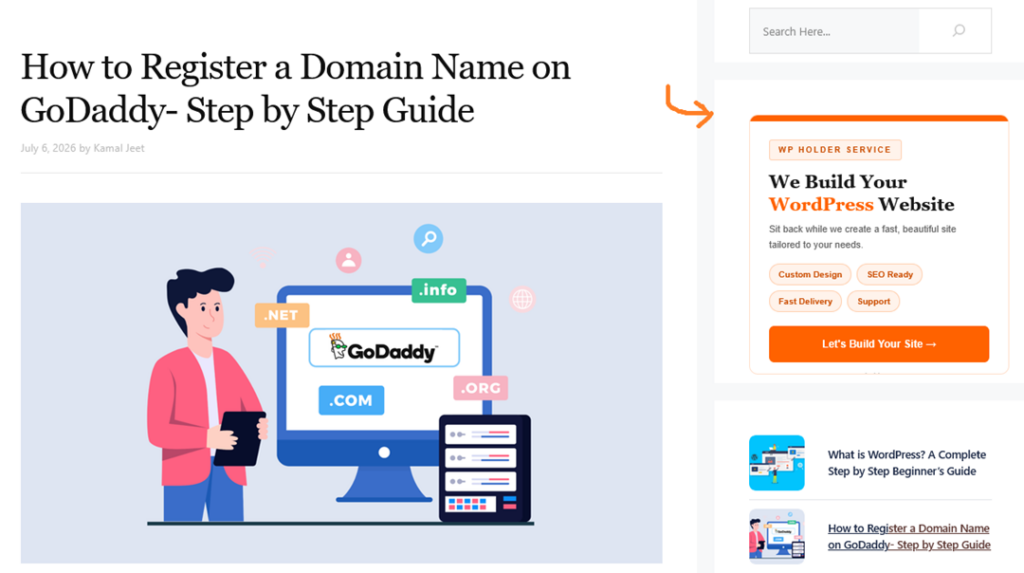
WordPress gives you an easy way to manage sidebar content using widgets. Widgets are small blocks that you can add, remove, and rearrange without any coding.
To add content to the sidebar,
First go to Appearance » Widgets in your dashboard. Here, you will see the sidebar area, which will already contain some default widgets.
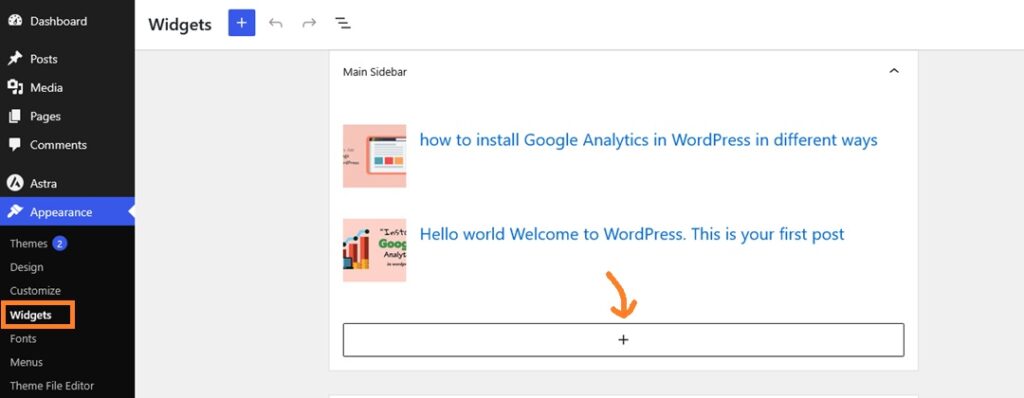
To add a new widget, just click the ‘+’ icon and select a block.
These widgets work best for new websites.
- Search – Helps visitors find your content quickly.
- Latest Posts – Shows your newest articles automatically.
- Categories – Lets readers browse topics they like.
- HTML – You can add any html code
Once finish, click the ‘Update’ button to save your sidebar.
Installing essential plugins
Plugins are like apps for your website. They add new features without touching a single line of code.
There are currently over 59,000 free plugins available in the WordPress directory. However, as a beginner, you will only need a few essential plugins.
To install the plugin, go to Plugins » Add New Plugin. Then, search for the plugin name, click ‘Install Now’, and subsequently click ‘Activate’.
Here is full guide : How to Install WordPress Plugin – Tutorial
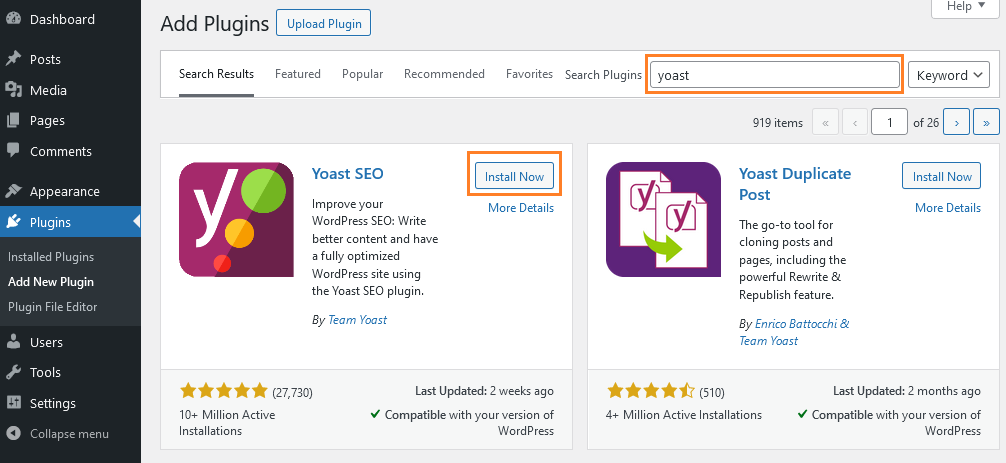
Here are the essential plugins that every new website should have :
- Yoast SEO – Helps your content rank better in Google search results.
- Akismet – protects your blog from spam specially comments
- UpdraftPlus – Automatically backs up your website for security.
- LiteSpeed Cache or WP Super Cache – Helps your pages load faster.
- Wordfence Security – Protects your site from hackers and malware.
- Smush – Compresses images so your site stays quick.
Note : Do not install too many plugins at once. Too many plugins can slow down your website and cause conflicts between them. Keep only the plugins you actually use.
Setting up SEO-friendly permalinks
A permalink is the web address of every post and page on your website. Simply put, it is the link that people see and share.
By default, WordPress might generate ugly links with dates or numbers, like this:
http://yoursite.com/2026/07/11/sample-post/
However, you should keep the link clean and short so that it looks better and Google can easily understand it.
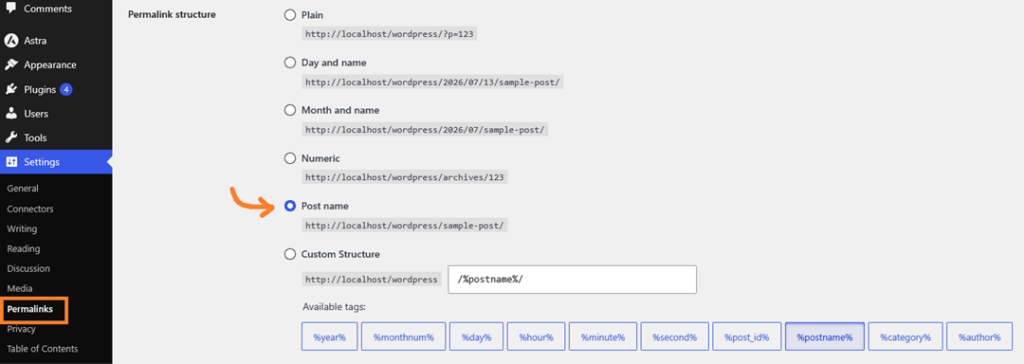
The good thing is that it takes less than a minute to change this. First, go to Settings » Permalinks in your WordPress dashboard.
Next, select the ‘Post name’ option from the list. This structure is short, clean, and the best choice for SEO.
http://yoursite.com/sample-post/
Now, click the ‘Save Changes’ button at the bottom. That’s it! From now on, every new post and page will have a clean, SEO-friendly link.
You can also add available tags from the list, such as category, author, etc.
Creating essential pages
Every professional website needs certain standard pages. Visitors expect them, and Google trusts websites that include these pages.
At the very least, you should create these pages:
- Home – The main page of your website.
- About – Tells visitors who you are and why they should trust you.
- Blog – Displays all your new posts in one place.
- Contact – Allows people to get in touch with you via a contact form.
- Privacy Policy – Builds trust and keeps your site legally secure.
To create a page, go to Pages » Add New Page from your WordPress dashboard.
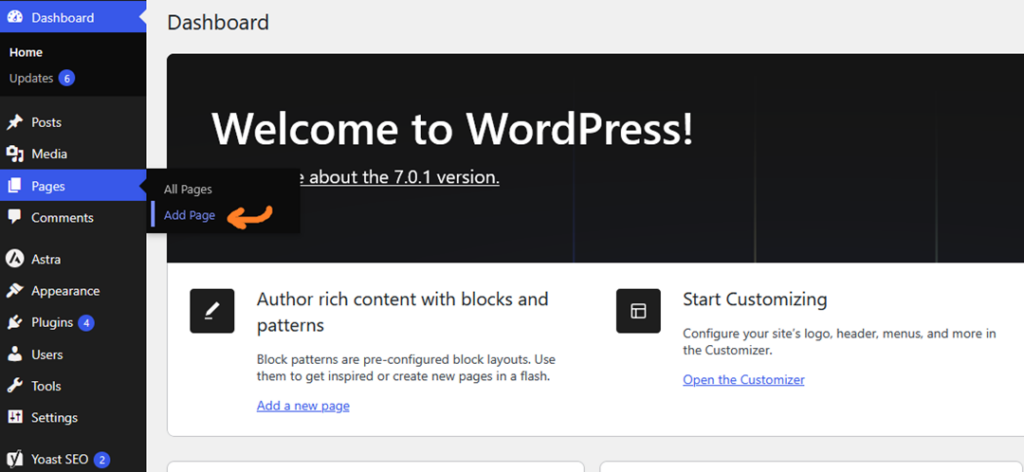
Then, enter a title, write your content, and click the ‘Publish’ button.
When you install WordPress, it automatically generates a few pages for you such as “Privacy Policy” and “About Us” which you can either edit or replace with new pages of your own.
Writing Your First Post
Your website is ready. Now it’s time to add content to your newly created WordPress site. Let’s publish your first post.
First, go to your WordPress dashboard and click on Posts » Add New Post. You will see the WordPress block editor.
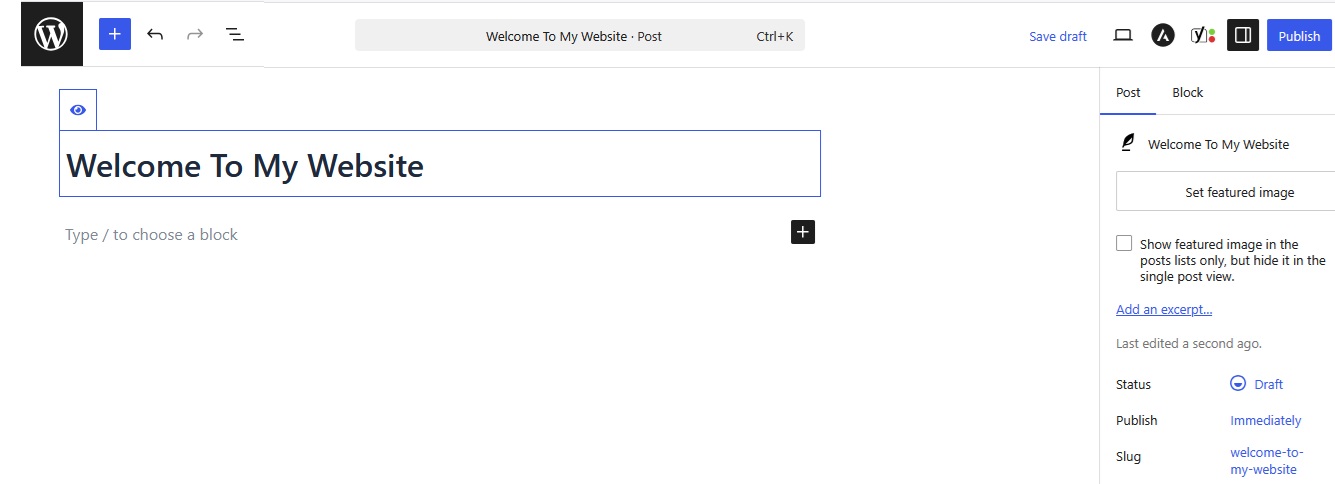
Right at the top, you will find the option to add a title for your post. For instance, your first post might be a basic welcome message such as ‘Welcome to my website’ .
Start writing your content right below the title. It works with editor blocks. Each paragraph, image, or heading is a separate block.
Click the ‘+’ icon to add a new block. You can then choose from images, headings, lists, videos, buttons, and more.
Once your post is ready, click the “Publish” button at the top right to share your article with the world.
Read Complete Step by Step Guide : How to Create a New Post in WordPress
We hope this article has helped you learn how to create a WordPress website. Once your site goes live, focus on regularly creating useful content, as it is content that drives visitors from Google to your site.
Best of luck with your new website.
