
Do you want to know how to register a domain name on Namecheap from scratch? Then you have come to the right place. You don’t need any technical skills for this. Just follow the steps given and your domain will be live in less than 10 minutes.
Plus I will also share tips to help you save money and keep your domain secure.
So, whether you want to start a blog, launch a business, or simply secure your name online so that no one else can use it, this guide is for you. Let’s get into it.
Why Namecheap and not others?
Well, This is the first question almost everybody ask. When There are so many registrars out there, why is it a good idea to invest your time and money in Namecheap?
So, Here’s the real deal: most domain registrars offer a low price for the first year but hit you with a hefty bill at renewal time. Namecheap doesn’t do that. The difference between the first-year price and the renewal price is minimal. Plus, what really sets Namecheap apart is WhoisGuard.
When you register a domain, your name, phone number, and address go into a public database called WHOIS, where anyone can see them. With most registrars like GoDaddy and others, you have to pay extra to hide this information. But at Namecheap, WhoisGuard privacy is completely free.
This alone makes it a smart choice. Also, Namecheap’s checkout process isn’t like a crowded shopping mall. You won’t face numerous pop-ups forcing you to buy upgrades. You just buy your domain and move on. The process is fast, easy, and direct.
Consider this Before You Search for a Domain Name
Before searching for or buying a domain, take a couple of minutes to think about its name. After all, once you register it, you will have to work with that same name for at least a year. So, here are a few things that really matter:
Choose a Name that People Remember
Your domain name is the first thing people see. If it is long, confusing, or difficult to spell, people will skip it. Just think about it, you want a name that people remember after hearing it just once. For example, wpholder.com is short and clean, and it clearly indicates what the site is about.
Stick with .com If Possible
There are several domain extensions available in 2026. Such as .io, .co, .online, and .store, among others. However, when thinking of a website, the first thing that instinctively comes to mind is a .com. Therefore, it is always advisable to choose the .com version of your domain name first.
Avoid These Mistakes
- Do not use hyphens in the name (my-wpholder.com looks unprofessional)
- Avoid using numbers unless they are part of your brand
- Do not copy another brand’s name (not even slightly)
- Do not pick a name that is difficult to say out loud
Important Tip
Say the domain name you are choosing out loud to a friend. If they ask you how to spell it, the name is likely too difficult. Keep it simple enough that no one ever needs to ask.
You can also read our detailed guide on Choosing a Domain Name for your website
How to Register a Domain Name on Namecheap
Alright, let’s get to the actual action now. Follow the below steps one by one, and you will be done registering your Namecheap with in just 10 minutes.
Step 1: Open Namecheap and Go to the Domain Search
Open your browser and go to namecheap.com. The homepage will load, and you will see a large search bar in the middle of the screen. That is where it all begins.
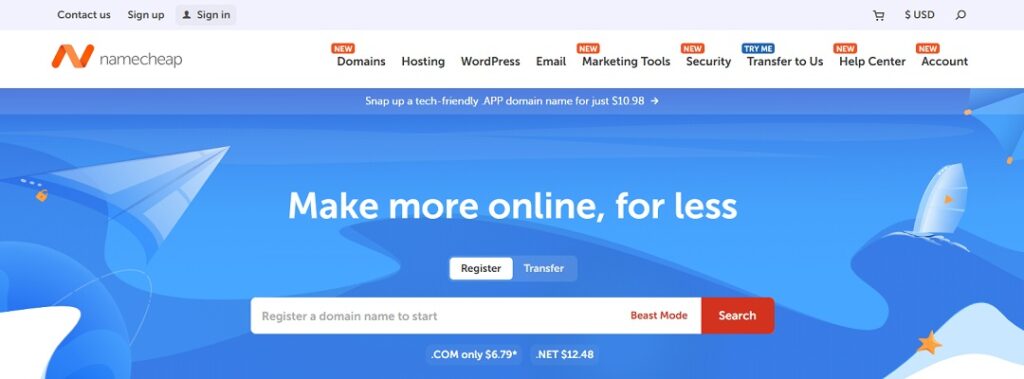
The Home page is clean and straightforward. It doesn’t have any flashy banners or confusing menus. In fact, that is one of the first things people notice- Namecheap keeps things simple so that you don’t feel lost when you land on the page.
Step 2: Type In Your Domain Name and Hit Search
Now, type your desired domain name into the search box. For example, suppose you want to start a website Pinzole.com, you might type something like “Pinzole”.
Then, Hit the “Search” button.

Namecheap checks availability in just a second or two. You are then presented with a results page that provides the following information:
- Whether your chosen name is available or already taken
- Pricing for various extensions (.com, .net, .org, .io, etc.)
- Smart suggestions if your first choice is unavailable
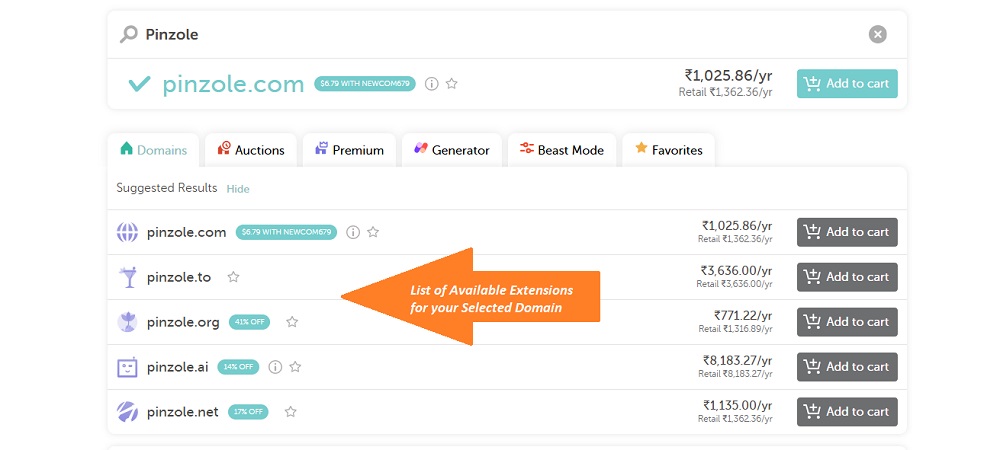
If the .com version is available, grab it right away. But if it is already taken, just scroll down. Namecheap will give you many alternatives. Sometimes a small change in the name like adding a word or an alphabet in your domain name gives you some great available options. for example, If “Pinzole” is not available, you can try something like “Dinzole”.
Quick Tip
Namecheap has a feature called Beast Mode. So, if you want to check 20 or 30 domain names all at once, click “Beast Mode” at the top of the search results. You can paste a list of names and it checks them all together. It is useful when you have a bunch of name ideas and want to find out which ones are available.
Step 3: Add your Domain to Cart
Once you find a name you like, click the “Add to Cart” button next to it. It will change into a checkmark, indicating that the domain is now added in your cart.

After this, Namecheap might show you some optional add-ons, such as hosting or email. These are all extras. So, you can skip them for now by simply ignoring the offers. You don’t need them at this stage.
Step 4: Review your Cart
Once you have added your Domain name into your cart, you may want to review everything before you make the final payment.
Click “View Cart” button located on the Top right of the page.
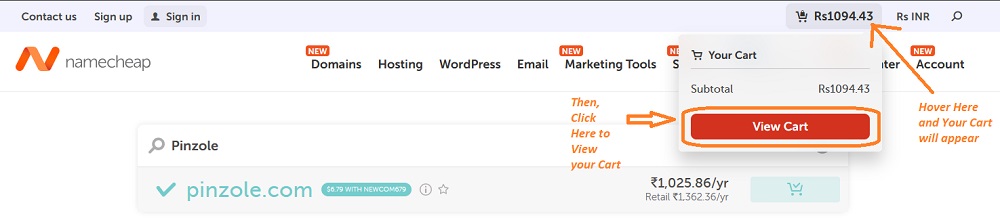
After the Cart page appears, take a moment here to check if:
- The Domain name is correct ✓
- The Registration period ✓
- WhoisGuard Privacy will show as free ✓
- The Total price looks right ✓
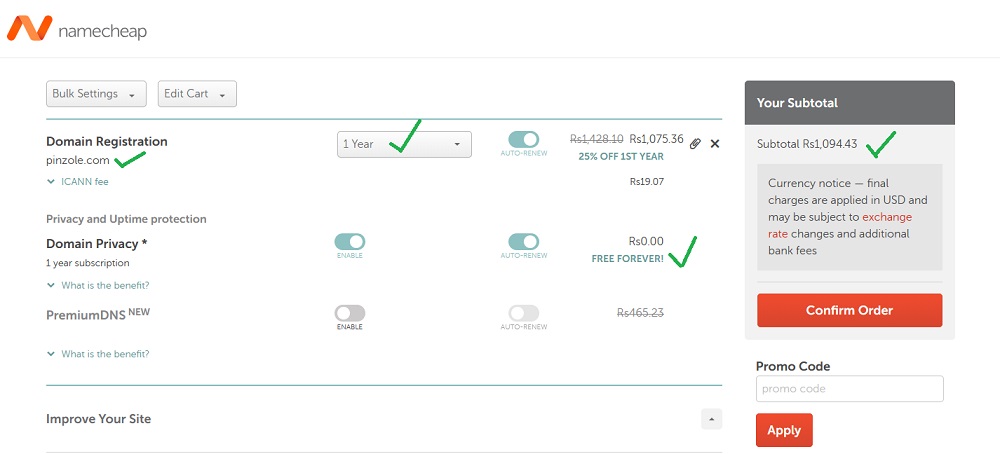
You can Turn ON/OFF the Auto-renew button as per your requirement. You can also apply the Promo codes here, if you have any.
Here is something most beginners don’t know: Namecheap regularly offers promo codes. So, before making a payment, do a quick Google search for “Namecheap promo code 2026.” You will often find a code that gives you a 10–20% discount on your first domain. Simply enter that code into the promo box on the page.
When everything looks correct, click on “Confirm Order” to proceed to the next step.
Step 5: Sign In or Create Your Namecheap Account
You need to log in or create a new account on Namecheap to proceed further. If you are here for the first time, you need to fill in all the required details under “Create an account“.
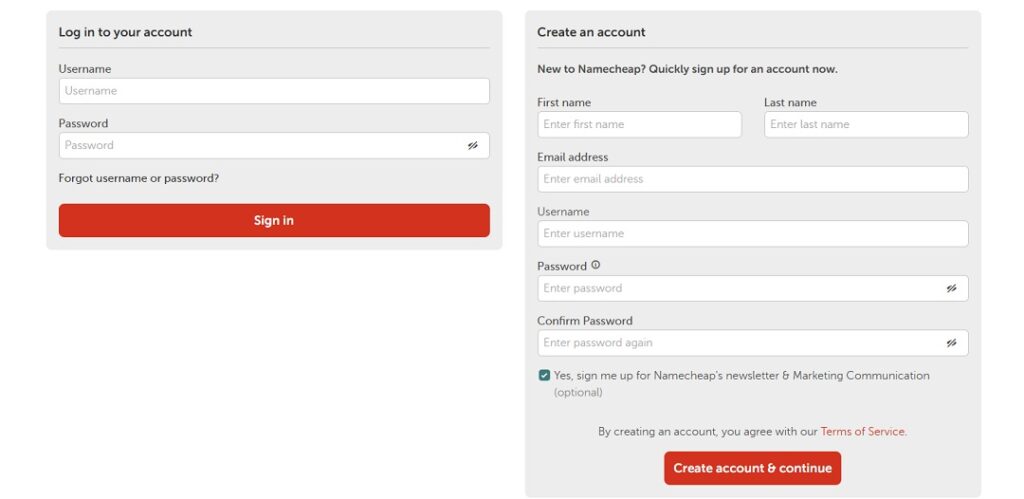
The Sign up form asks for information like:
- Your First and Last Name
- Email ID
- Username (This will be used to login in future)
- Password
After you fill in all the required details, click “Create Account and Continue” and your account is ready. Namecheap will now redirect you to the payment page.
Step 6: Enter your Billing Details
Now that you are on the payment page. Namecheap will ask you to fill your account contact information.
This is your name, phone number, and address. Even though your WhoisGuard privacy hides this from the public, ICANN still requires you to fill it in accurately. So, use your real information here.
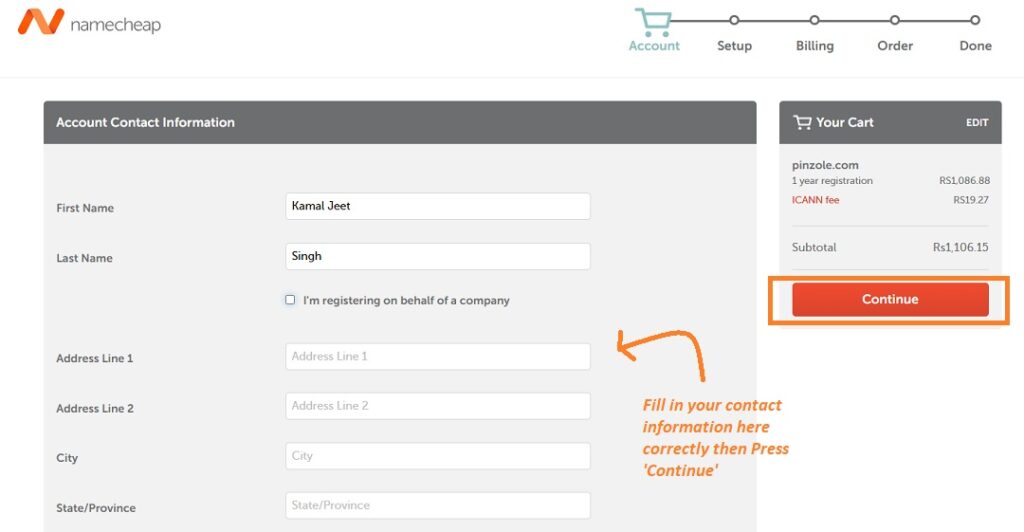
Once you have done this, click on “Continue.” The setup page will then open, where you will see the contact information you just provided. If everything is correct, simply click on “Continue” again here.
Step 7: Make Payment
You are now on the payment page. Namecheap accepts more payment methods than any other registrar. So, you pick whatever works best for you:
- Credit Card (Visa, Mastercard, Amex)
- PayPal
- Namecheap Account Funds (if you have topped up earlier)
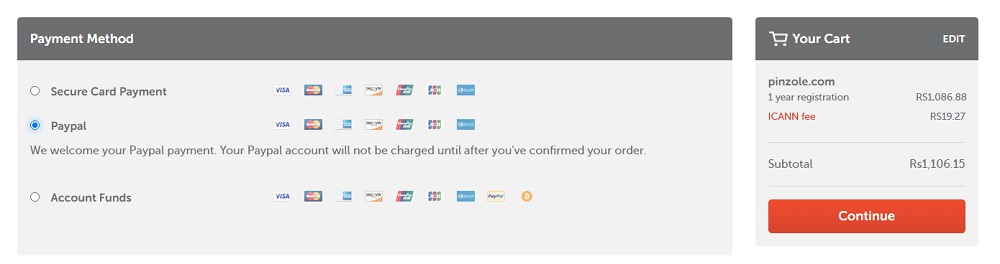
Just select your payment method and fill in all the details. For instance, if you have selected to pay by your credit card, you have to fill your credit card number and name on card etc.
Now, review your order summary under “Your Cart” for one last time on this page. if everything is correct, Click “Continue” and make the payment.
And voila, your domain name is now yours.
Step 8: Verify Your Email and Check Your Inbox
After payment, two things happen almost immediately. First, Namecheap sends you a payment confirmation email which contain your receipt and order details. Second, they send a separate email for Email address verification.
To verify your address, you must click the link provided in that second email. This is a mandatory ICANN requirement. If you fail to do so, your domain could be suspended.
So, open your inbox immediately after purchasing. Find the verification email from Namecheap and click the link provided in it. This entire process takes about 10 seconds. After that, your domain registration is fully complete and active.
Where to Find and Manage Your Domain on Namecheap After Purchase
Once you register a domain name on Namecheap, it appears in your account dashboard.
Here is how to access it:
- Go to namecheap.com and Sign in to your account
- Click on your username in the top right corner
- Select “Dashboard” from the dropdown menu
- Click on “Domain List” in the left-hand menu and your domain will appear
- Click “Manage” to control it.
Three Things You SHOULD Do After You Buy
- 1. Enable auto-renewal: Go to your domain list and check if auto-renewal is enabled. Namecheap usually keeps this on by default, but it is best to verify. This single setting prevents you from losing your domain name if you forget to renew it manually next year.
- 2. Ensure WhoisGuard is enabled: Go to your domain’s ‘Manage’ page and locate the WhoisGuard section. Make sure it shows as “Enabled.” It should be on by default, but confirming it takes only five seconds. This protects your personal information from spammers who harvest data from public WHOIS records.
- 3. Connect your domain to your website: Right now, your domain is sitting idle and serving no purpose. To link it to your website, you need to update the nameservers on the ‘Manage’ page. Your hosting company provides two nameserver addresses; simply paste them in and save the changes. Your domain will then connect to your website within 24–48 hours. This process is known as DNS propagation.
Now that you have a domain name, you probably want to build a blog or website. You can check out our detailed guide on ‘How to Create a WordPress Website,’ which covers everything you need to know to get started.
