Hello WP Holders, Are you looking for how to install Google Analytics in WordPress? You should install Google Analytics on your website if you are a serious publisher and want to achieve your goal.
Google Analytics is the most popular web analytics service on the Internet by using it we can track how visitors are interacting with our relevant content.
In this article, we will tell you how to install Google Analytics in WordPress in different ways. We will tell you all this step by step.

Why to Install Google Analytics G4 in WordPress ?
Google Analytics g4 is a web analytics service provided by Google that tracks and reports website traffic. In simple terms Google Analytics is the eyes of our website, allowing us to see how the world interacts with our content.
Google Analytics help us to track website activity such as traffic, pages per session, engagement rate, source of traffic and much more.
When it comes to web analytics, the first name that comes to mind is Google Analytics which gives information about your audience’s behavior. This will help you make decisions to improve your website and content strategy so you can achieve your goal.
So let’s go ahead and see how to install Google Analytics.
Lets Setup Up Google Analytics Account
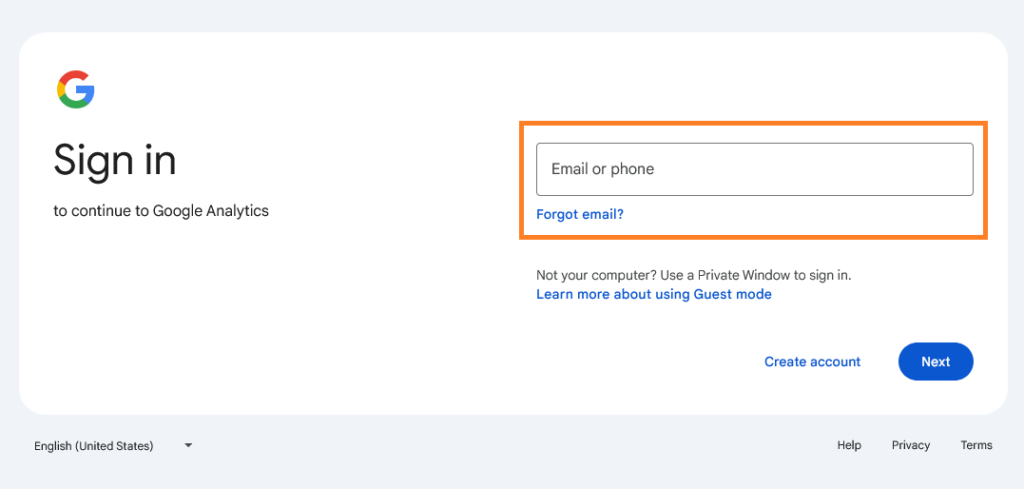
To install Google Analytics in WordPress, first you need to create a Google Analytics account, so head over to the Google Analytics website to sign up. ‘Get Started Today’ button.

Now click on ‘Get Start Today’, Google will ask you to login with your Google account. If you already have a Gmail account then you can login directly or you can also create a new account.
So to login enter your email address click on next enter password and proceed
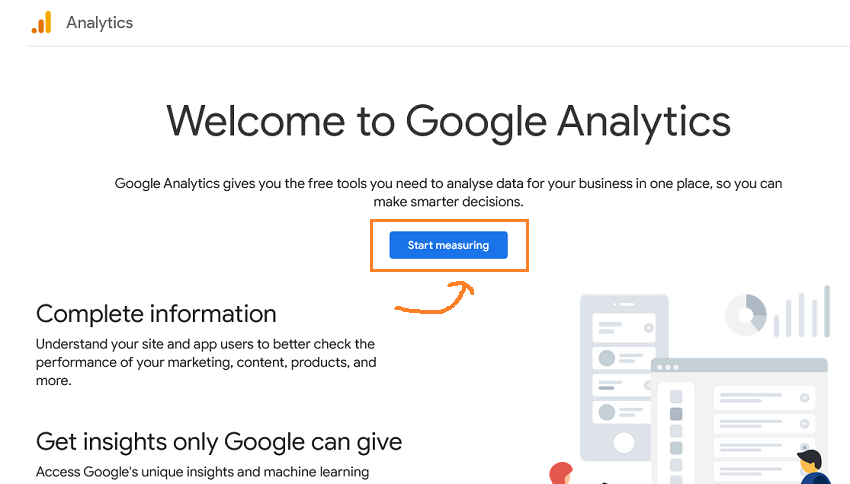
The journey of Google Analytics starts as soon as you sign in. Now you will see a welcome page. You have to click on the ‘Start Measuring’ button.
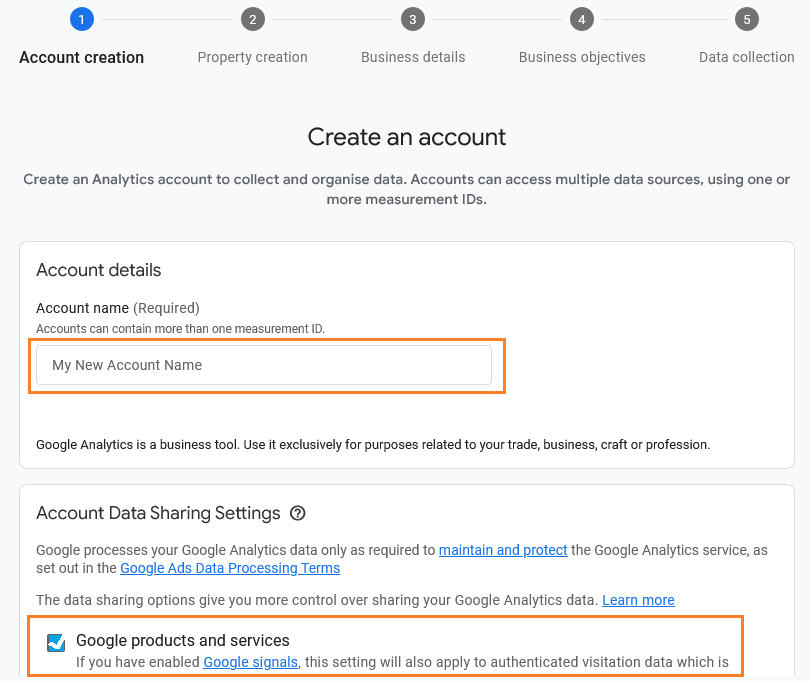
In this step you have to give a name to your analytic account. You can give any name to it, it can be your business name or whatever you want to give.
You can keep the default account data sharing settings and proceed to the next step
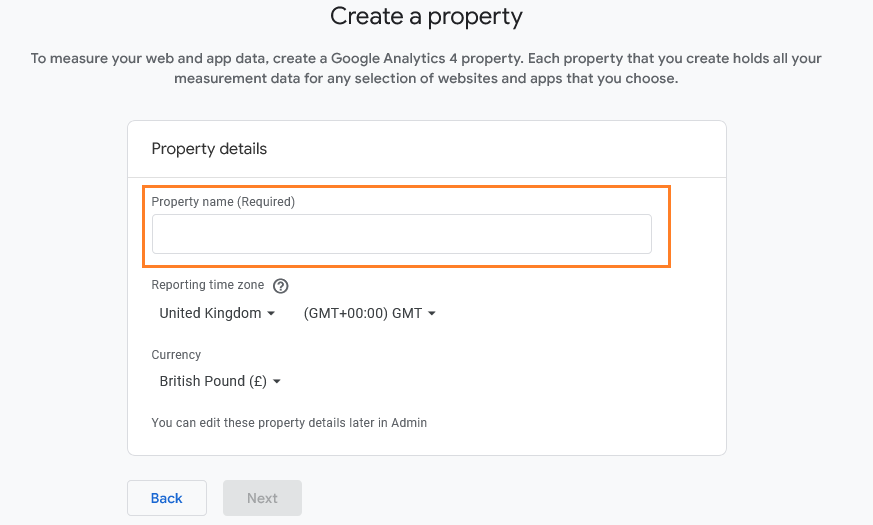
In the next step you need to create a property, enter the ‘Property Name’, you can choose any one like mywordpress or mysitename
Also select your ‘Reporting Time Zone’ and ‘Currency’ from drop down menu. Then click the ‘Next’ button
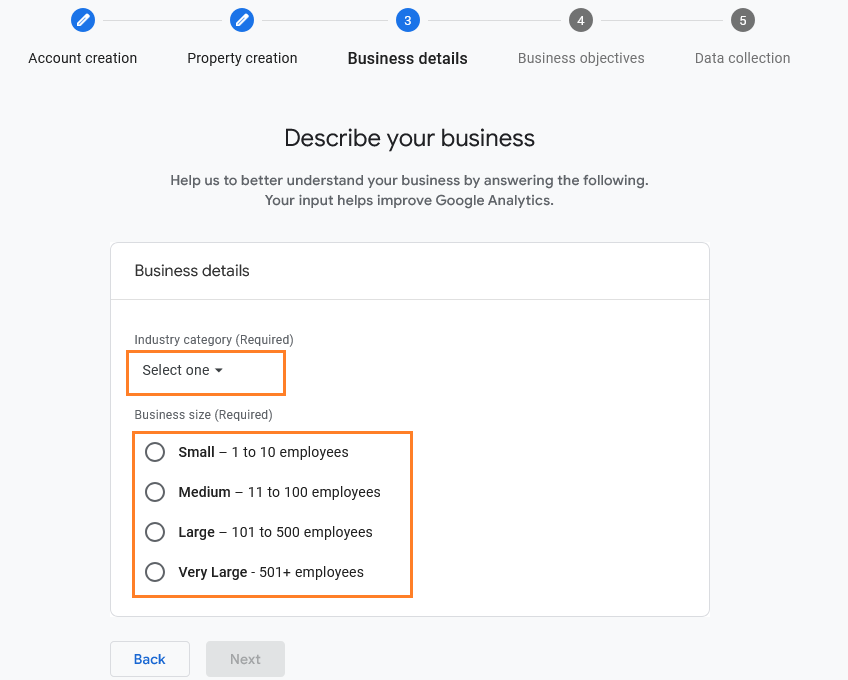
In this step you need to describe your business, select the ‘Category’ from the drop down menu your WordPress website belongs to
What is the size of your company ? i.e. how many employee work for you? Select one of the option and then click on ‘Next’ button.
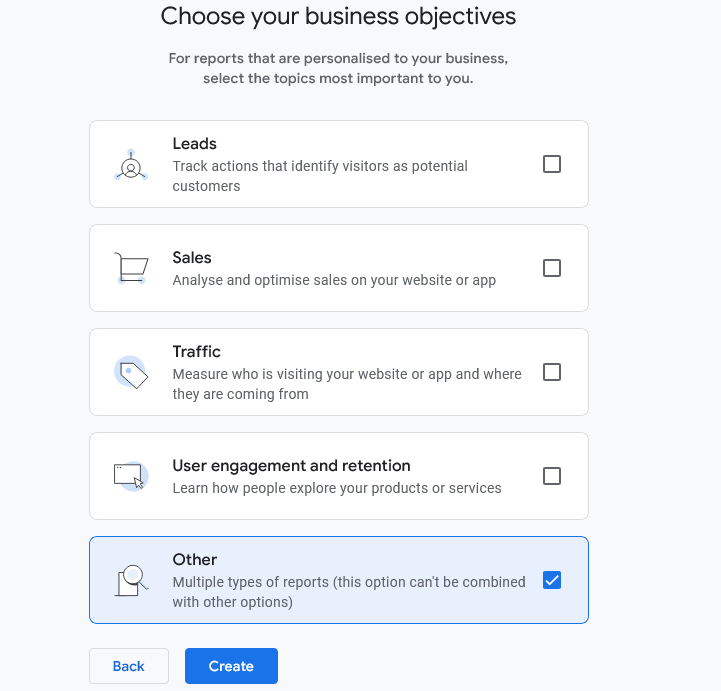
Choose your business object, in this step you need to tell what is your purpose of using Google Analytics Lead generation, Sales, Traffic or User engagement and retention, Other
You can choose any one option or multiple options. If you choose ‘Get Baseline Reports‘ option you will get all Google Analytics reports.
Choose business objectives
After selecting the option, click on the Next button for further processing
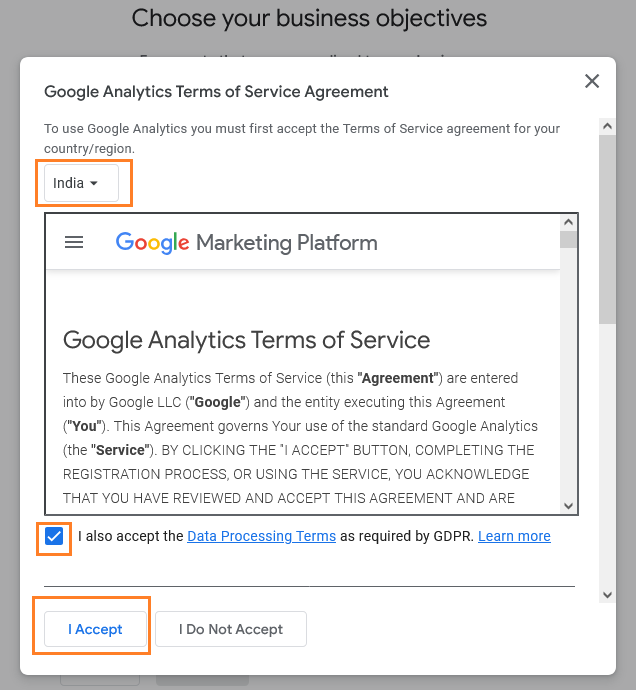
You must accept the Google Analytics Terms of Service Agreement. Select your country or region from the drop down menu and then Accept Google Analytics Terms of Service Agreement.
When you are done, simply click the ‘I Accept’ button
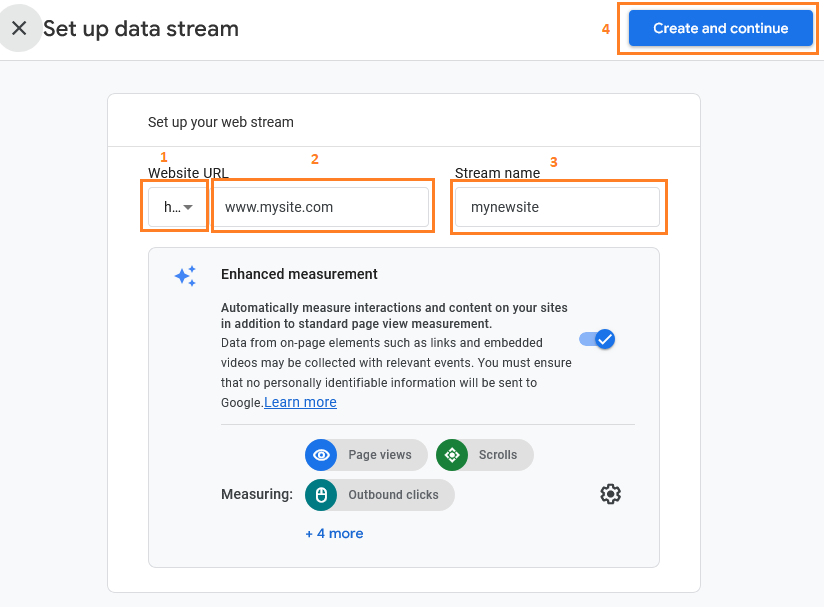
You now have the Google Analytics Web Stream options to choose. As you know we are setting up Google Analytics for WordPress, we will choose the ‘Web’ option.

Set up your web stream, first select https:// from the drop down menu, then enter your WordPress URL and then in Stream Name you can enter any name or your site name.
By default, the ‘Advanced measurement’ option will be enabled in Google Analytics now click on ‘Create and Continue’ button
Take a calm breath you are going to complete this long process just click on the ‘arrow’ next to your site as shown in the image below.
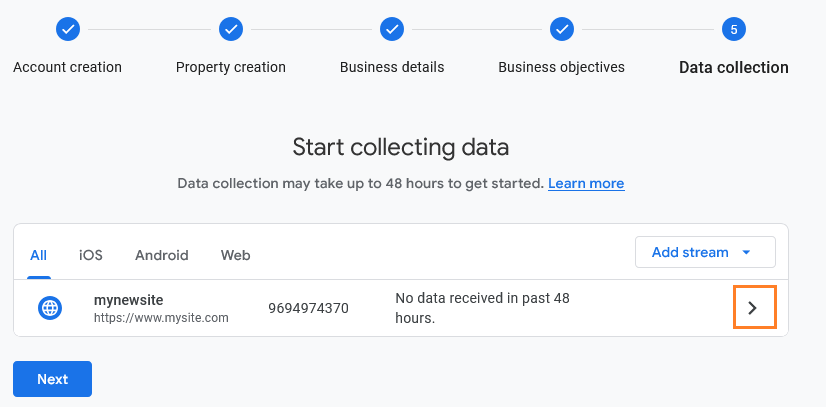
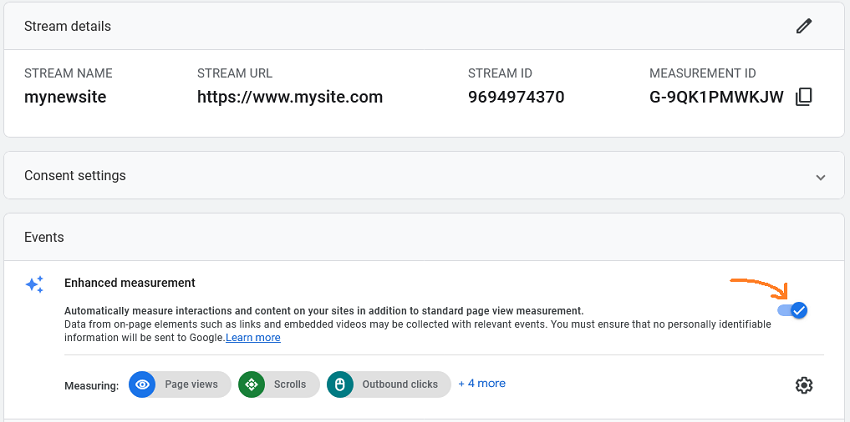
Now you have the stream name, URL, ID, and measurement ID. Next to the measurement you can see the various advanced measurements that Google Analytics will record.

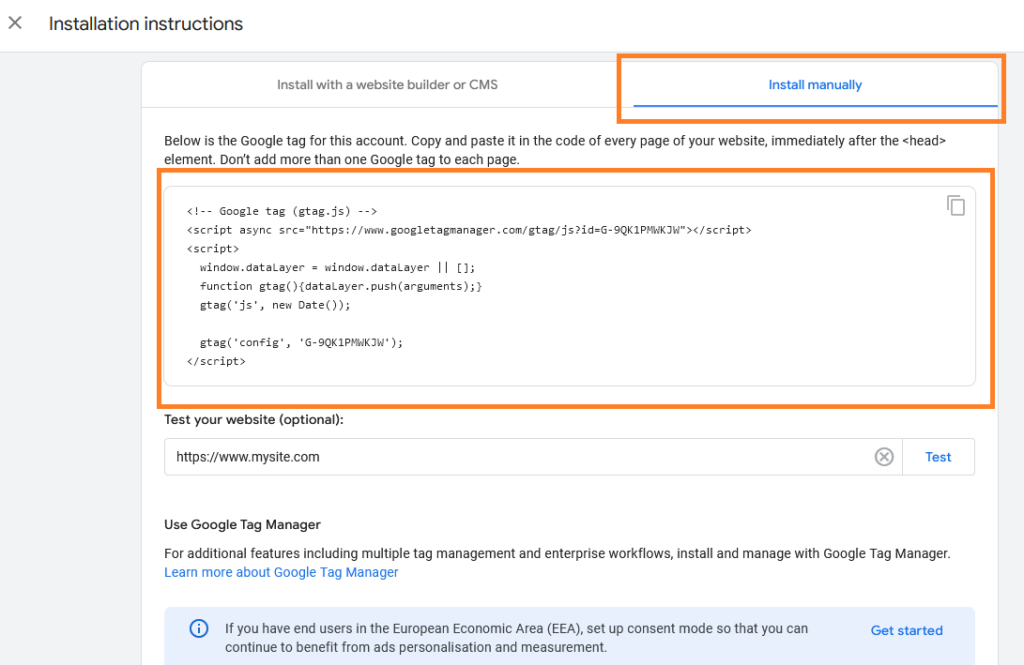
Congratulations, your Google Analytics account is now ready! Now all you need to do is install Google Analytics on your WordPress website.
There are two options given below, you can do it manually or through a plugin. You can choose any one as per your convenience.

If you want to install it manually then copy the code and save it in a text file or we can copy it from here later. We will tell you how to install analytics it in the next step.
How to Install Google Analytics in WordPress ?
As I mentioned above, Google Analytics can be installed in two ways. Through a plugin or install manually script.
Here we will talk about both the methods. You can install it in any one of the ways as per your convenience.
1
Install Google Analytics in WordPress Theme
If you don’t like installing unnecessary plugins in WordPress then Google Analytics can be installed manually without any plugin, for which you do not need to install any plugin.
To manually install Google Analytics we can do it by editing theme’s header.php file
‘Make sure to take a backup of file before making any changes.‘
First, copy the code from Google Analytics Now go to Appearance » Theme File Editor and click on the Header.php file from the right side panel Now paste the code just before </head>
Now Click on ‘Update File‘ button

After installing the Google Analytics code, Clear the cache of your WordPress website and then go back to the Analytics website.
Now click on the side test so that you can know whether the Google Analytics code is installed correctly or not.
2
Install Google Analytic Manually using Widgets
In this method, we will discuss how to install Google Analytics using the widgets
Go to Appearance » Widgets
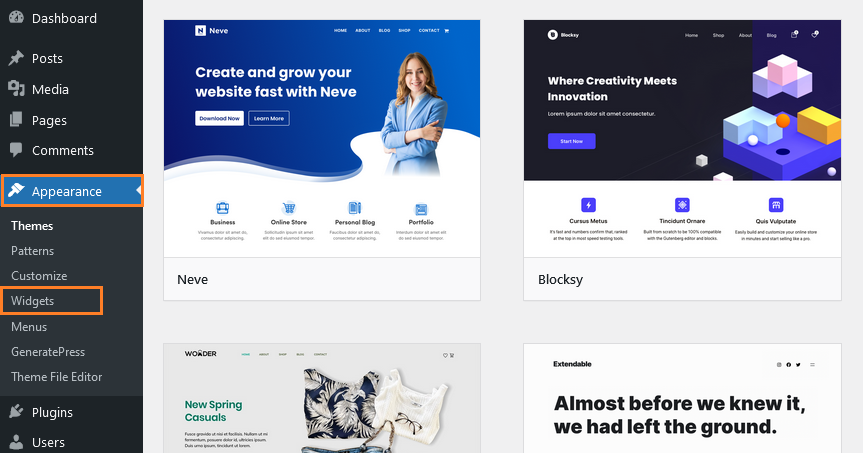
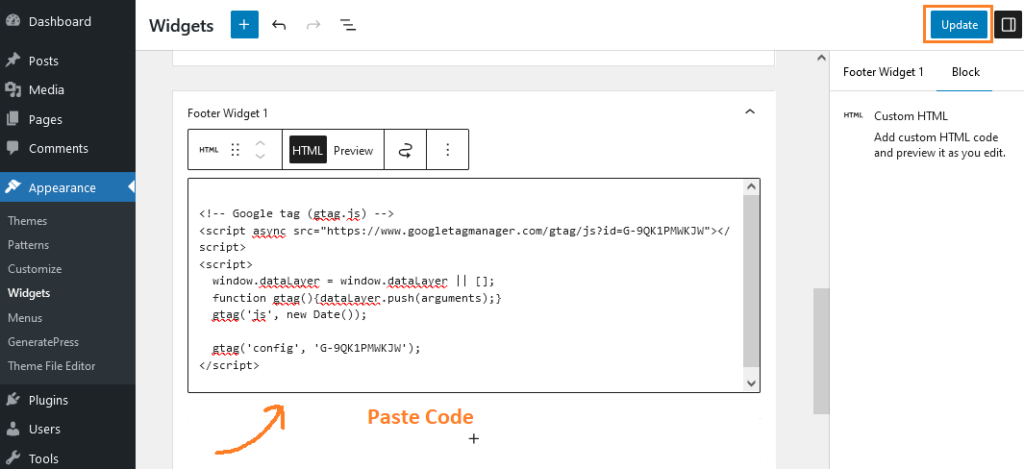
We need to add the Google Analytics code in the footer widget or header widget, here we are going to paste the code in the footer widget.
Simply click on footer widget and then click on + icon to add block, you have to add custom HTML block from the list or add by searching.

Paste the Google Analytics code inside the box as shown in the screenshot below and then Click on Update button.
That’s it, now you can test your website from the Google Analytics dashboard.
3
Install Google Analytics Using MonsterInsights plugin
You can integrate your Google Analytics account with MonsterInsights (WordPress) free of charge
The first thing you need to do is install and activate the MonsterInsights plugin, go to plugins » add new plugins search MonsterInsights click on install and active.

To Launch the MonsterInsights plugin click on setup wizard
First you need to choose a category for your website that best describes your site (business website, Publisher blog or Ecommerce). Choose one and then click on the ‘Save & Continue’ button.

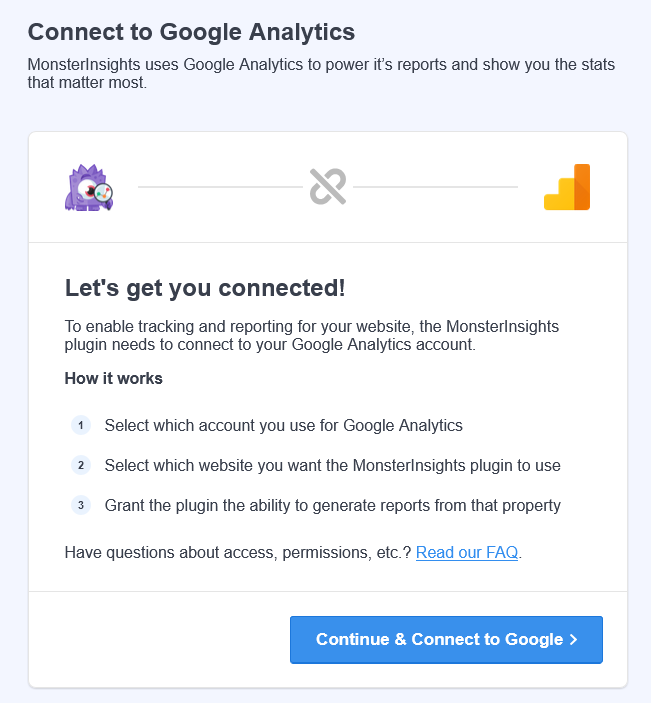
Go ahead, just click on the ‘Connect MonsterInsights’ button

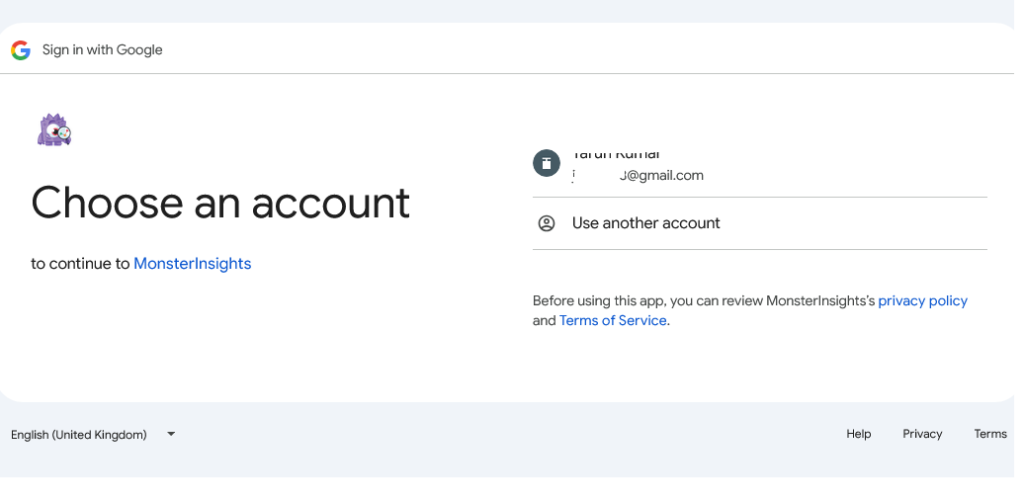
Connect to Google Analytics, you will be asked to sign in or select Google Account if you are already signed in.
Choose your google account to continue to MonsterInsights
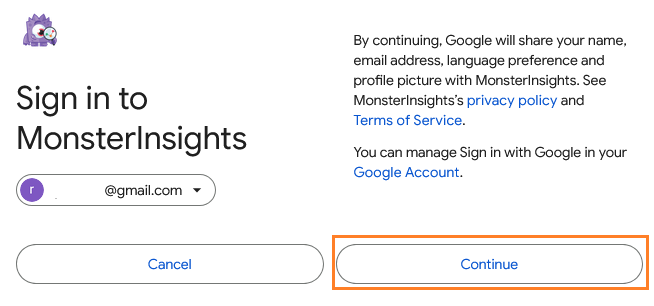
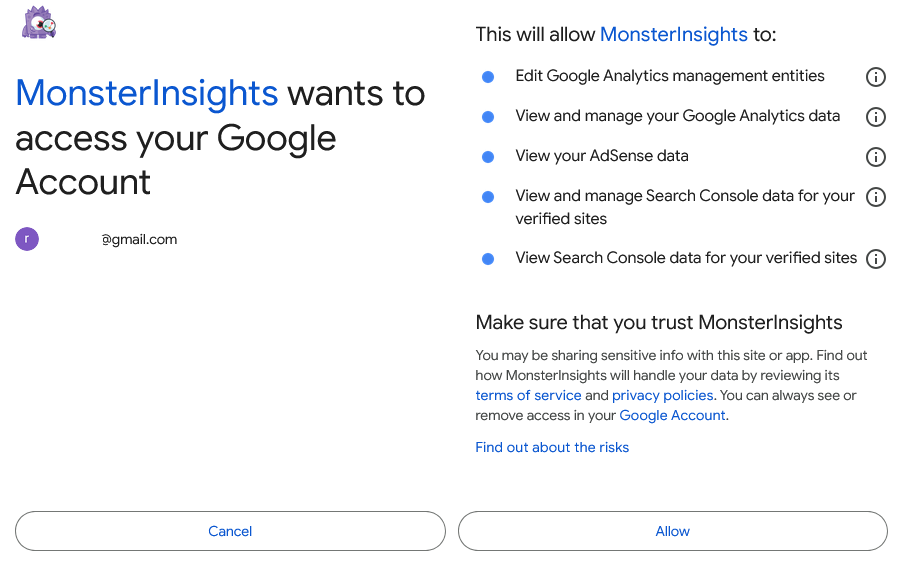
Accept the terms and conditions and click on the Continue button.
Now, you will be asked to allow MonsterInsights access to your Google Analytics account, click on the Allow button to proceed.
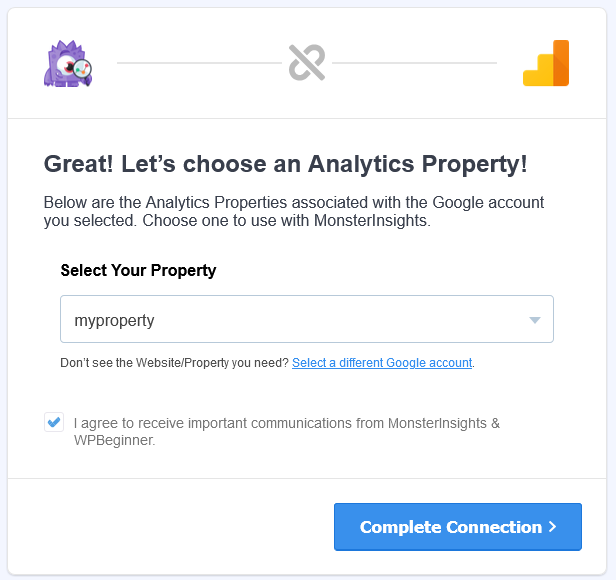
In this step you need to select the property (profile) you want to track, if you have multiple then select one otherwise it will be selected automatically.
Now, click on Complete Connection button
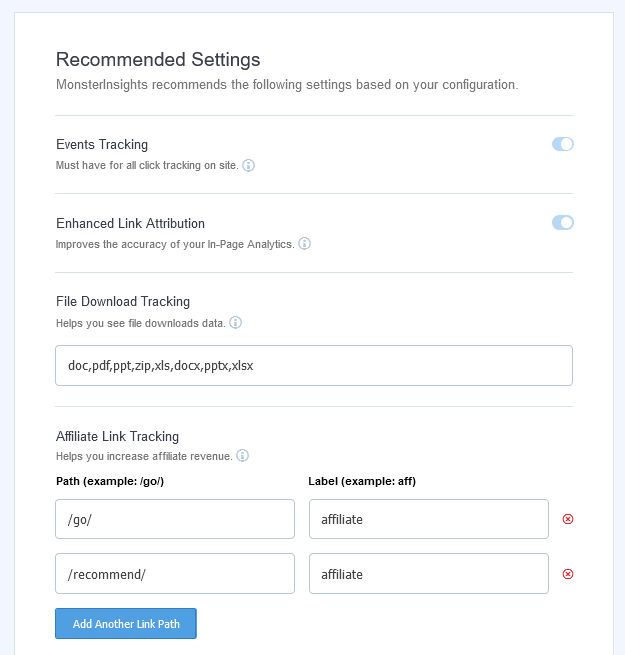
After that, you will see the recommended settings for your website
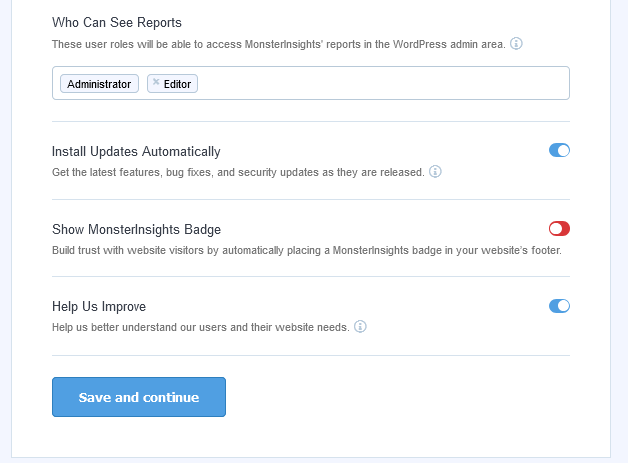
Scroll down to see who can access the report from the WordPress dashboard. If you want both admins and editors to be able to view the report then keep both or you can remove the editor if you want only admins to view the report.
Click on Save and Continue button.
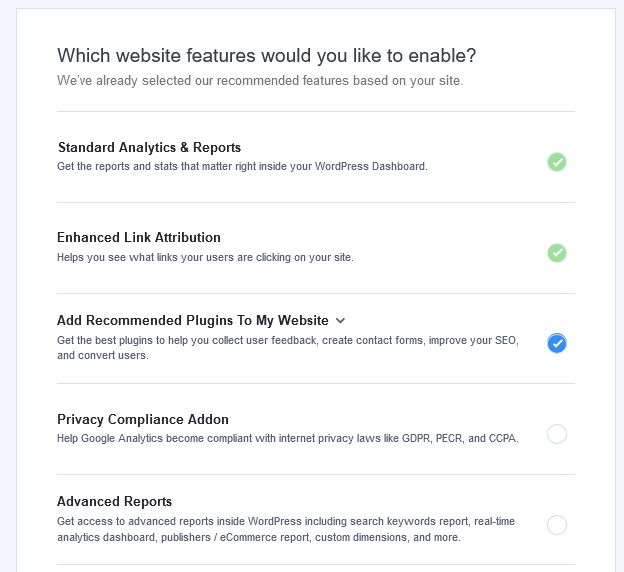
Which website features would you like to enable? It will select recommended features based on your site.
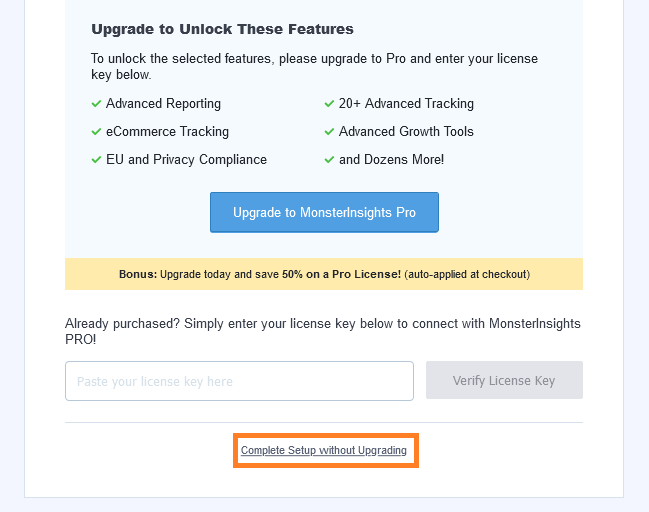
You can simply continue on the free version by clicking the ‘Complete setup without upgrading’ button. Or you can upgrade, and enter your license key if you have already purchased MonsterInsights.
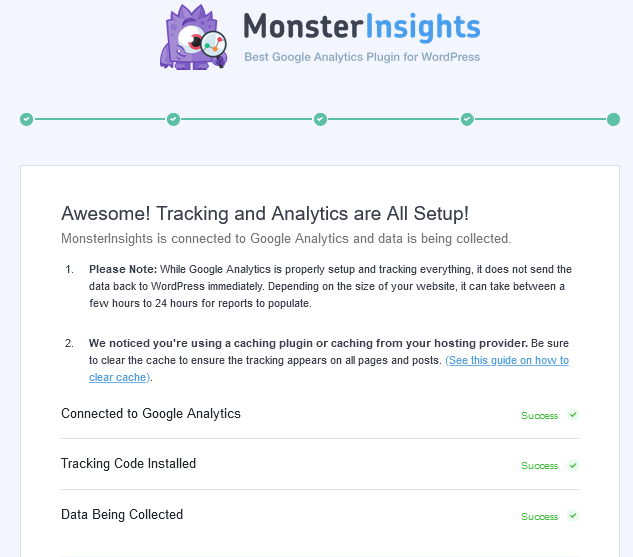
It’s done.
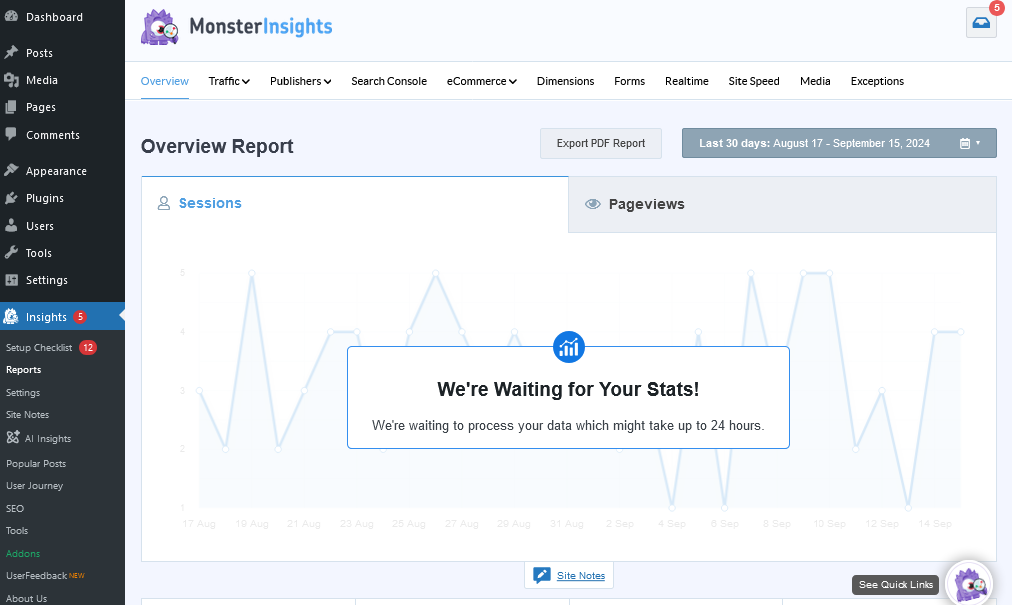
Now you can view analytics reports directly in WordPress dashboard without having to go to the Google Analytics website.
How do I turn off enhanced measurement in GA4?
- Login to to google analytics
- Visit Admin
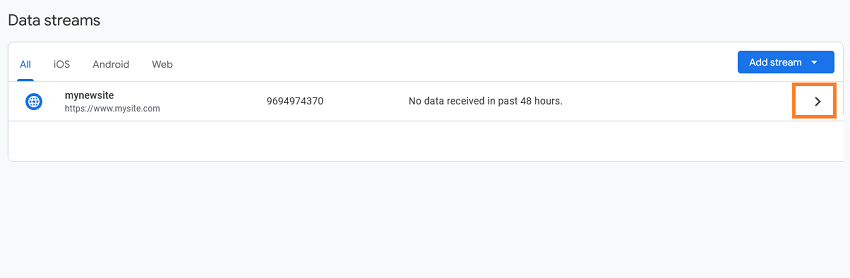
- Data Streams
- Click on site
- disable enhanced measurement
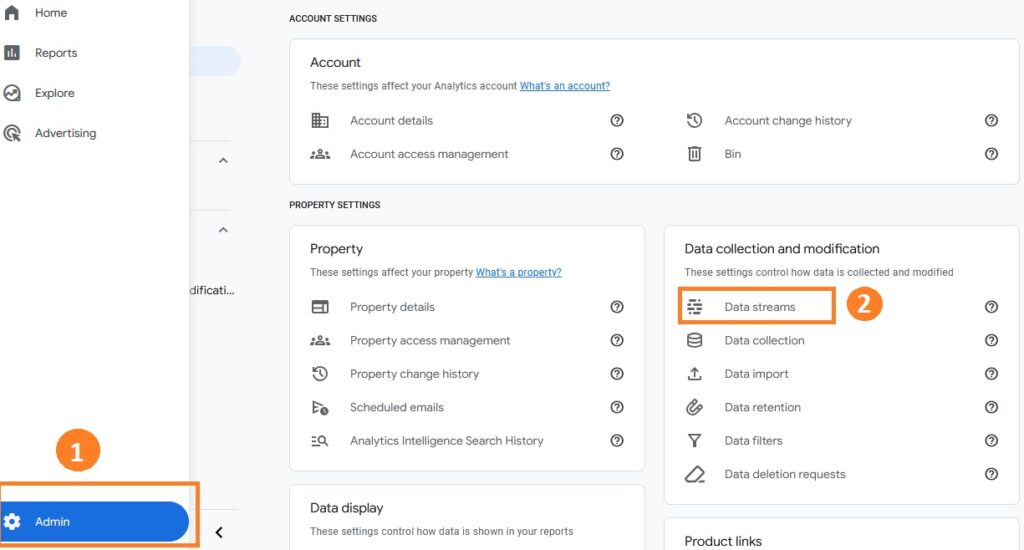
Click on admin button then go to data streams and click on arrow button next to website.
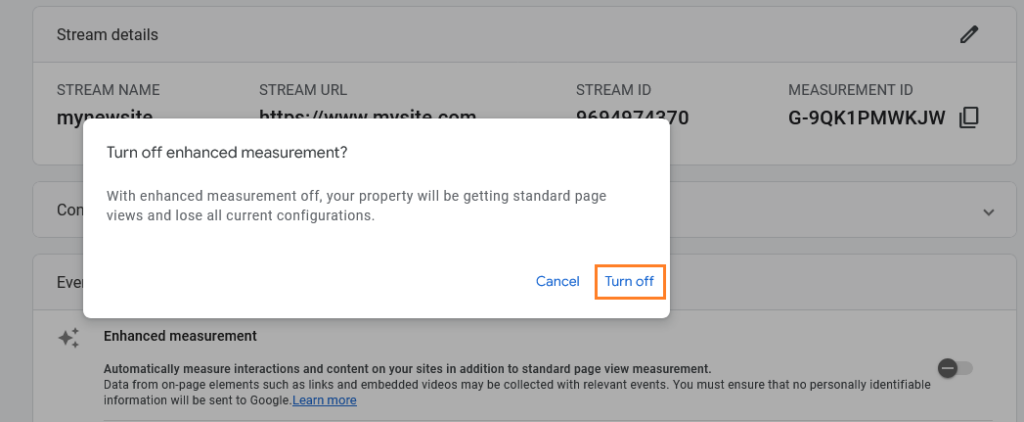
Turn off enhanced measurement button.
A Popup will open to confirm just click on Turn Off button.
Google Analytics G4 has been successfully installed. If you are facing any problem, you can ask in the comment box.
Thank You.
Read More :