Can’t see the Theme File Editor option? Sometimes you want to manually customize your WordPress theme directly from the dashboard, but this option is sometimes unavailable. This usually means that theme editing has been disabled.
If the theme file editor is missing from your WordPress dashboard, you might be wondering if it has been disabled by WordPress or if there’s a problem with your WordPress installation.
In this article today, we will discuss step-by-step why the theme editor is not showing and how to fix it.

Why is the Theme Editor option missing in WordPress?
There are several main reasons why you might not see the Theme File Editor in your WordPress admin menu.
1. Using managed WordPress hosting
Nowadays, all hosting providers are offering managed WordPress hosting. With security in mind, they prefer that WordPress users edit themes using an FTP client like FileZilla instead of directly through the dashboard.
2. Theme Editor Is Disabled in wp-config.php
WordPress has a built-in constant called DISALLOW_FILE_EDIT. If this constant is set to true, both the Theme Editor and Plugin Editor options will be hidden in your dashboard.
define( 'DISALLOW_FILE_EDIT', true );
Developers or hosting companies often add this line to prevent users from accidentally breaking the site by editing the code.
3. Missing User Permissions
Only the main website administrator account has full access to Theme File Editor.
4. Security Plugins Disable Editing
Some security plugins, such as Wordfence, or Sucuri, disable theme editing as a protection against malware injection.
How to Fix the Missing Theme Editor Option?
There are two main reasons why your theme editor might be missing.
- A security plugin has disabled it for protection.
- wp-config.php – A line of code inside has turned it off.
Let’s look at both the reasons and the easy steps to get the theme editor option back.
Method 1: Check Your Security Plugin Settings
Sometimes, security plugin like Wordfence, iThemes Security, or Sucuri, it may have automatically disabled the theme file editor. These plugins often disable the editor as a safety measure to prevent anyone, such as hackers, from editing your theme or plugin files directly from the dashboard.
Please note that if you don’t use any security plugins, skip to the next step.
For a quick check, Temporarily Deactivate a security plugins you are using for security purpose and check if the theme editor option is available.
If the Theme File Editor option is still missing after deactivating the security plugin, this isn’t the cause. Follow Method 2 instead.
If you see the theme file editor after disabling the plugin, it means the plugin was hiding it. For now, reactivate your security plugin.
Next,
To enable the theme file editor, you’ll need to make some changes to your security plugin settings. Here are the steps to disable the “Plugin and Theme Editor” feature in Popular Plugins.
- Wordfence : Go to Wordfence » All Options » General Wordfence Options and look for “Disable code editing.”
- Sucuri Security : Check “Disable plugin and theme editor” under Hardening Options.
- iThemes Security: Open Security » Settings » WordPress Tweaks, and turn off the option called “Disable File Editor.”
Turn this feature off if you want the Theme File Editor back, then “Save” your changes. Reload your WordPress admin dashboard, and hopefully the theme file editor will appear.
If the Theme File Editor still missing or you’re not using a security plugin skip to the next method.
Method 2 : Check the wp-config.php File
The theme file editor may be missing due to a setting within your wp-config.php file. This file controls many parts of your WordPress setup, and just one line of code can hide theme file editor from your WordPress dashboard.
Here’s the line that causes it :
define('DISALLOW_FILE_EDIT', true);
This tells WordPress to prevent anyone, even administrators, from editing theme or plugin files through the dashboard.
To fix this, you can easily delete it or change its value from true to false or replace with the below code .
define( 'DISALLOW_FILE_EDIT', false );
As a beginner, you may be wondering how to find and edit the wp-config.php file in WordPress. There are two straightforward methods to access your wp-config.php file :
- Using your hosting control panel’s File Manager (like cPanel)
- Connecting through an FTP client such as FileZilla
Next, I will show you step by step how to find the wp-config.php file using both methods, how to open it safely, what to look for inside, and how to make changes without harming your site. Both approaches are beginner-friendly and will get you to the same destination.
Let’s get started
Method 2.1: Finding wp-config.php Using Your Hosting Control Panel (cPanel)
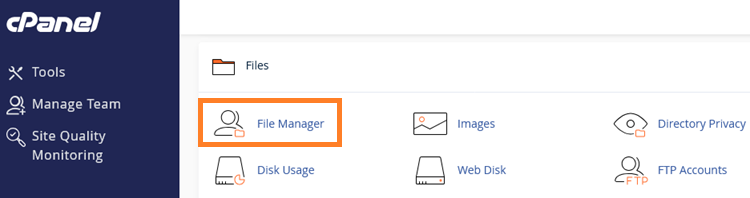
First, log in to your hosting account. Open your browser and go to your hosting website (e.g., Hostinger, Bluehost, Namecheap, etc.) find the cPanel option and click on it.
Inside cPanel, look for the File Manager option. It’s usually below the “Files” section and then Click File Manager.
A new page will open displaying all your website files.
Go to your site directory, which is usually public_html, and double-click on the globe icon to access it and see the files inside. If your WordPress is installed in a subfolder, then open that folder instead.
Inside this folder, look for a file named wp-config.php. This file is very important because it controls many of your WordPress site’s settings.
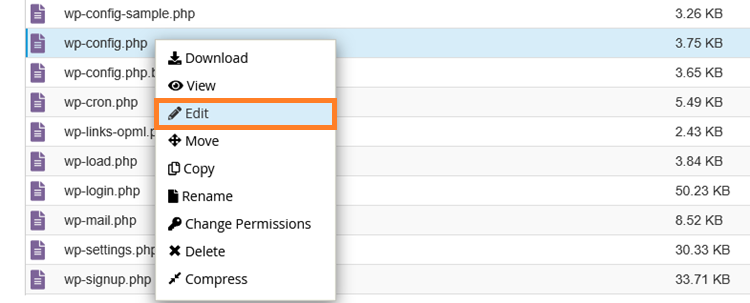
Note : Before editing anything, It is recommended to create a backup the file. In the file manager, right-click wp-config.php and select Copy or Download. This gives you protection in case something goes wrong.
Next, right-click on wp-config.php and click on the Edit button.
A small popup may appear asking about the encoding. Simply click Edit again to continue.
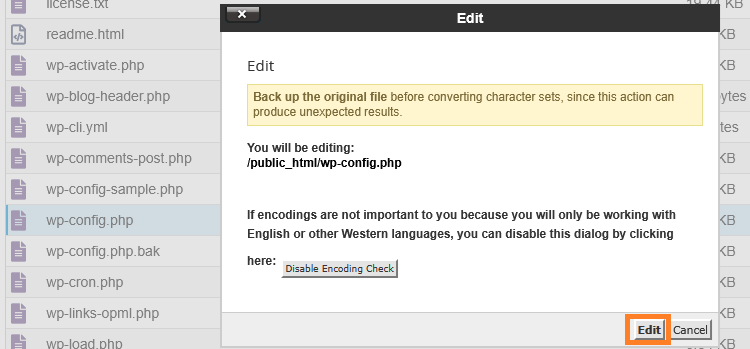
A text editor window will open showing the contents of the file. You’ll see PHP code with comments explaining what each section does.
You can now make changes to the code. Be very careful with spacing, punctuation, and spelling. Even a small mistake like a semicolon or quotation mark can ruin your entire website.
Now, Look for the following line in the code :
define('DISALLOW_FILE_EDIT', true);
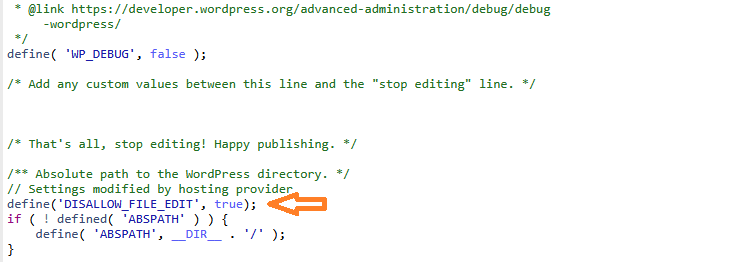
Hope you find this line and it is set to true, it means that the theme editor and plugin editor are disabled.
To enable them, Simply change true to false like this:
define('DISALLOW_FILE_EDIT', false);
After making the changes, click on the ‘Save Changes‘ button in the top right corner.
If this line does not exist, you can add above code just before the following line:
/* That's all, stop editing! Happy publishing. */Doing that, Go back to your WordPress dashboard. Refresh the page, you will now see Appearance → Theme File Editor.
That’s it.
Alternatively, if your hosting provider doesn’t have a cPanel service, you can also edit the wp-config.php file via FTP (Filezilla).
Method 2.2 : How to Find and Edit wp-config.php Using FTP (FileZilla)
First, you will need to install FileZilla on your computer. FileZilla is a free program that allows you to directly access your website’s files.
Step 1: Connect FileZilla to Your Website
Now connect FileZilla to your website using the login details provided by your hosting service provider. If you’re a beginner, follow the link below.
Here is full guide – How to Install and connect Filezilla to WordPress
Once connected, the right panel will be filled with your website’s folders and files. This means you’re now viewing the actual files that make up your WordPress site.
Step 2: Find the wp-config.php File
Look at the right panel in FileZilla where your can see your website files. You should see a main folder that contains all your website files. This folder is usually named public_html, www, or sometimes it has your domain name.
Double-click this folder to open it.
Inside, you will see several folders with names like wp-admin, wp-content, and wp-includes. You’ll also see several different files.
Scroll through the files until you find one named wp-config.php. This is the file we need to edit. It’s usually near the top of the file list because files are typically sorted alphabetically.
Step 3: Download a Backup Copy
It’s very important to create a backup before making any changes. This way, if something goes wrong, you can easily restore the original file.
Right-click the wp-config.php file in the right panel. Select Download from the menu that appears.
FileZilla will download the file to your computer. By default, it saves to the location shown in the left panel. You can also check your Downloads folder.
Keep this backup file safe. Don’t delete it until you’re sure everything is working properly after your changes.
Step 4: Edit the wp-config.php File
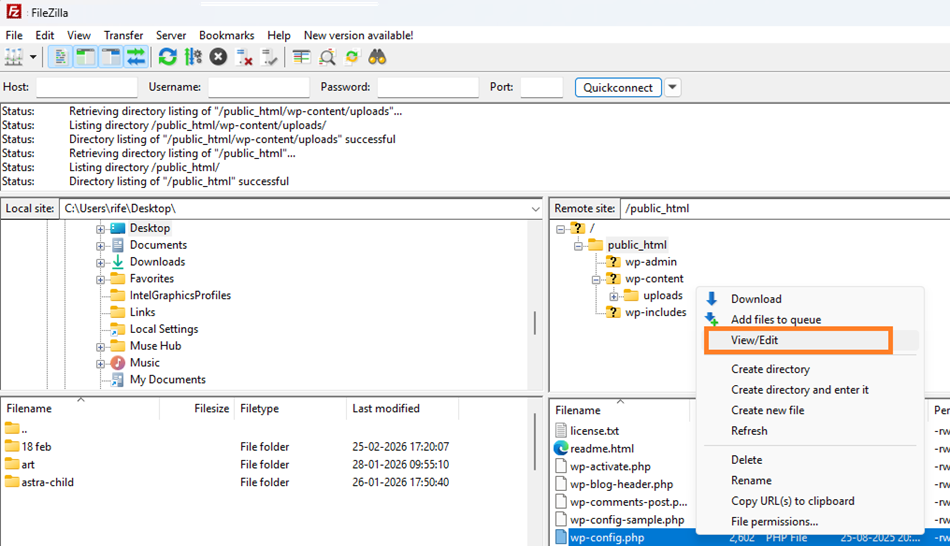
Now we’re going to make a small but important change to this file. Simply, right click on the wp-config.php and then click on View/Edit.
A pop up will ask to select and app to open the file you can choose to Notepad to open it.
Now, you will see lots of text and code We only need to find or add one specific line
Find this line :
define('DISALLOW_FILE_EDIT', true);
You need to change true to false. After editing, the line should look like this :
define('DISALLOW_FILE_EDIT', false);
If you don’t find this line at all
Scroll down until you find this line :
/* That’s all, stop editing! Happy publishing. */
Just above that line, add this new line :
define('DISALLOW_FILE_EDIT', false);
After making your change, save the file by going to File and then Save. You can also press Ctrl + S on Windows or Command + S on Mac.
Close the text editor.
Now that you’ve edited the file, fillezilla will ask you to upload your updated file back to your server.
Click Yes to confirm.
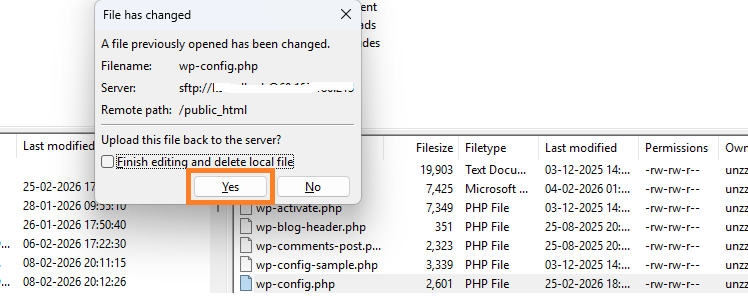
FileZilla will upload your edited file, replacing the old one. You’ll see a progress indicator for a moment, and then it’s done.
Step 5: Check if the Theme File Editor Is Back
Now let’s see if your fix worked.
Once you’re in your WordPress dashboard, look at the left sidebar menu. Find Appearance and hover over or click it.
You’ll now see the Theme File Editor sub-menu. Click on it.
If the Theme File Editor page opens, congratulations! You’ve successfully restored it. You can now edit your theme files directly from your WordPress dashboard.
What If Something Goes Wrong
Editing wp-config.php is safe, provided you exercise caution; however, mistakes can occur, and you may encounter some common problems.
- White Screen of Death – a syntax error in the file breaks the entire site
- 500 Internal Server Error – usually a bad value or broken line
- Locked out of wp-admin – wrong database credentials or debug settings
- Site loads but looks broken – incorrect URL or home path values
Here is what to do if something goes wrong.
Fix a syntax error – re-open the file, look for a missing semicolon ;, an unclosed quote ‘, or an extra space – these are the most common culprits.
Restore the backup – if you can’t find the error, simply re-upload your backed-up version and you’re back to normal instantly.
Thank you !